Let’s be honest: by the time the warm weather rolls around, the energy in a classroom changes. The fluorescent lights start to feel a little heavier, and everyone—including us teachers—keeps glancing at the windows, dreaming of sunny days and freedom. I used to look at my bare, slightly dusty classroom window panes and feel like they were completely draining the life out of my room. That was until I realized those glass panels are actually prime real estate for creating a cheerful, sunlit sanctuary.
Decorating your class window isn’t just about putting on a show for passersby; it is about changing how the natural light enters your learning space. When you harness that summer sunshine, you can create a warm, inviting environment that keeps your kids engaged and excited during those final, high-energy weeks of the school year. Whether you are prepping for a summer school session or just wanting to end the regular school year on a beautiful note, finding the right 16 summer classroom window that Pinterest loves can feel overwhelming when you are already short on prep time. That is why I have put together this list of easy, highly visual, and budget-friendly ideas that look amazing and actually hold up to the summer heat. Let’s dive in!
The Giant Watercolor Suncatcher Garden
What I personally love about this look is how it instantly softens the harsh afternoon sun into a beautiful, stained-glass glow. Picture walking into your room on a Tuesday morning and seeing the floor painted with soft pinks, warm yellows, and muted sage greens. It feels incredibly peaceful and whimsical, turning plain window glass into an active, blooming meadow. Your students will love watching the colors shift across their desks as the sun moves throughout the day.
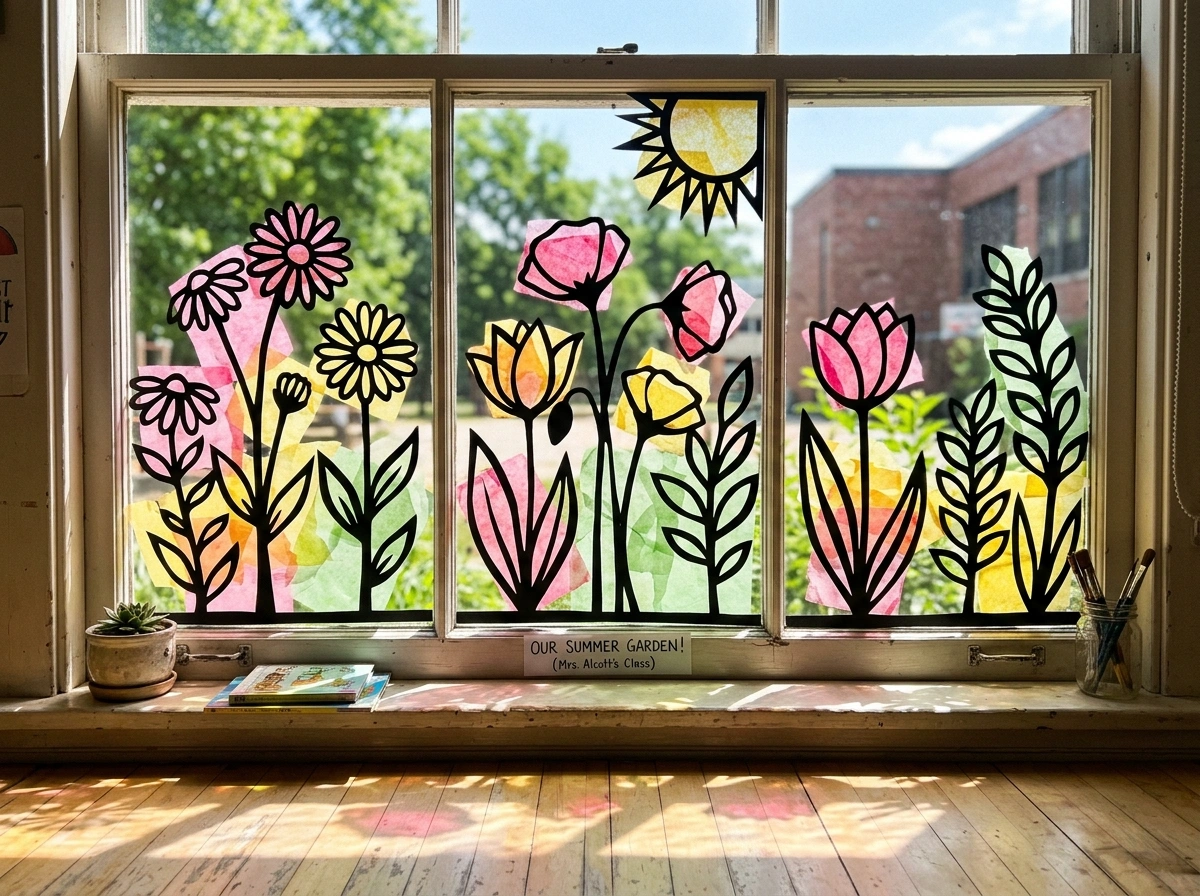
To recreate this garden, you will want to avoid expensive window films and opt for clear contact paper and cheap colored tissue paper instead. I always recommend starting with a simple black cardstock outline of wild flowers to create a crisp silhouette against the glass. Cut the tissue paper into small, irregular squares, layer them between two sheets of contact paper, and tape the panels to the window frame. In my experience, the biggest mistake people make is using school glue, which eventually dries up, cracks, and drops your hard work onto the floor. Budget around $10 for a roll of contact paper and a multi-pack of tissue sheets.
Under the Sea Bubble Paradise
If you are looking to create a cool, calming escape from the summer heat, this blue-toned underwater display is perfect. It gives the illusion of looking through a deep-sea porthole, filled with light blue cellophane, paper plate jellyfish, and iridescent bubbles that shimmer when the light hits them. It is a fantastic way to make a warm classroom feel instantly cooler and more relaxing just by changing the color palette of the incoming light.
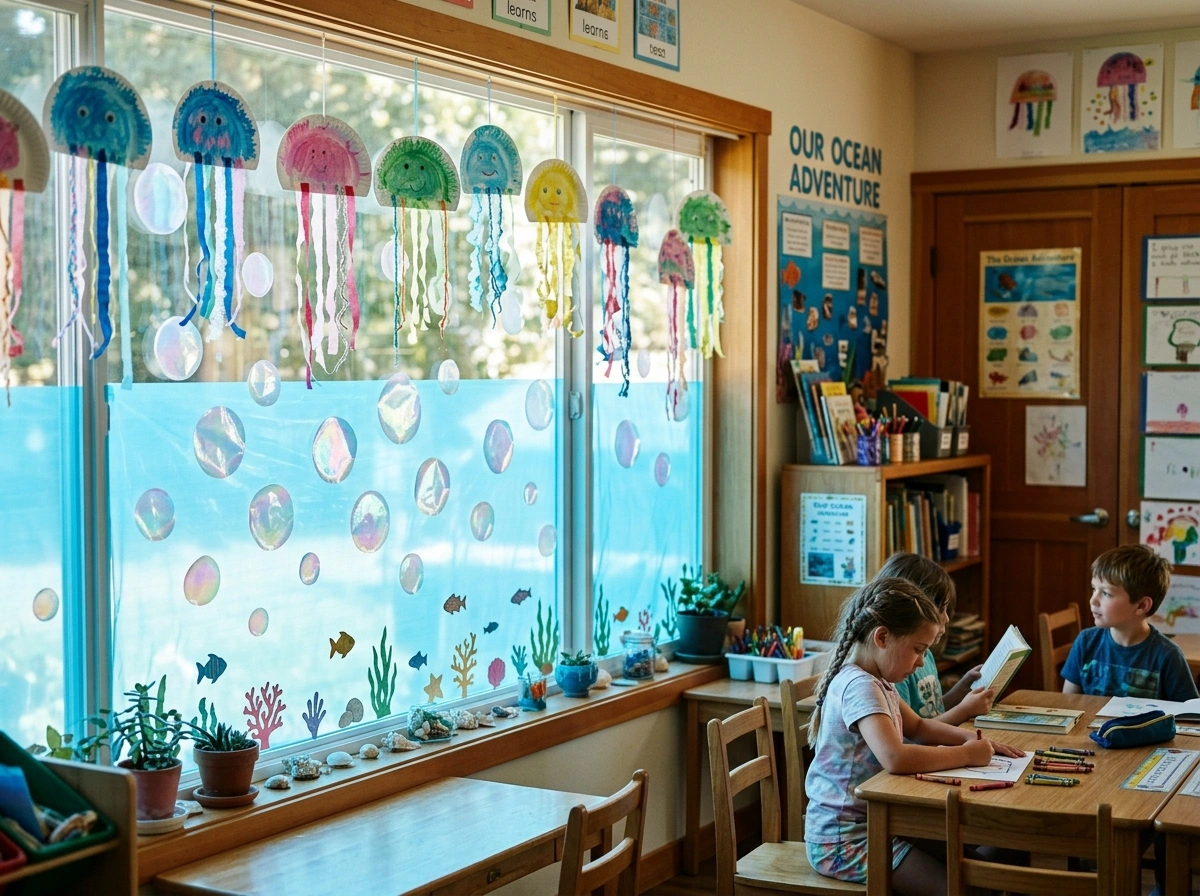
To make this work, start by covering the lower half of your window panes with cheap blue cellophane roll, securing the edges with clear painter’s tape. Have your students paint paper plates with bright watercolors, cut them in half, and attach curling ribbon to the bottom to act as tentacles. A lot of people overlook this detail, but hanging the jellyfish at varying depths using clear fishing line makes the window feel three-dimensional instead of flat. This setup is incredibly cheap, usually costing less than $15, and works especially well if you want to look more put together without trying too hard.
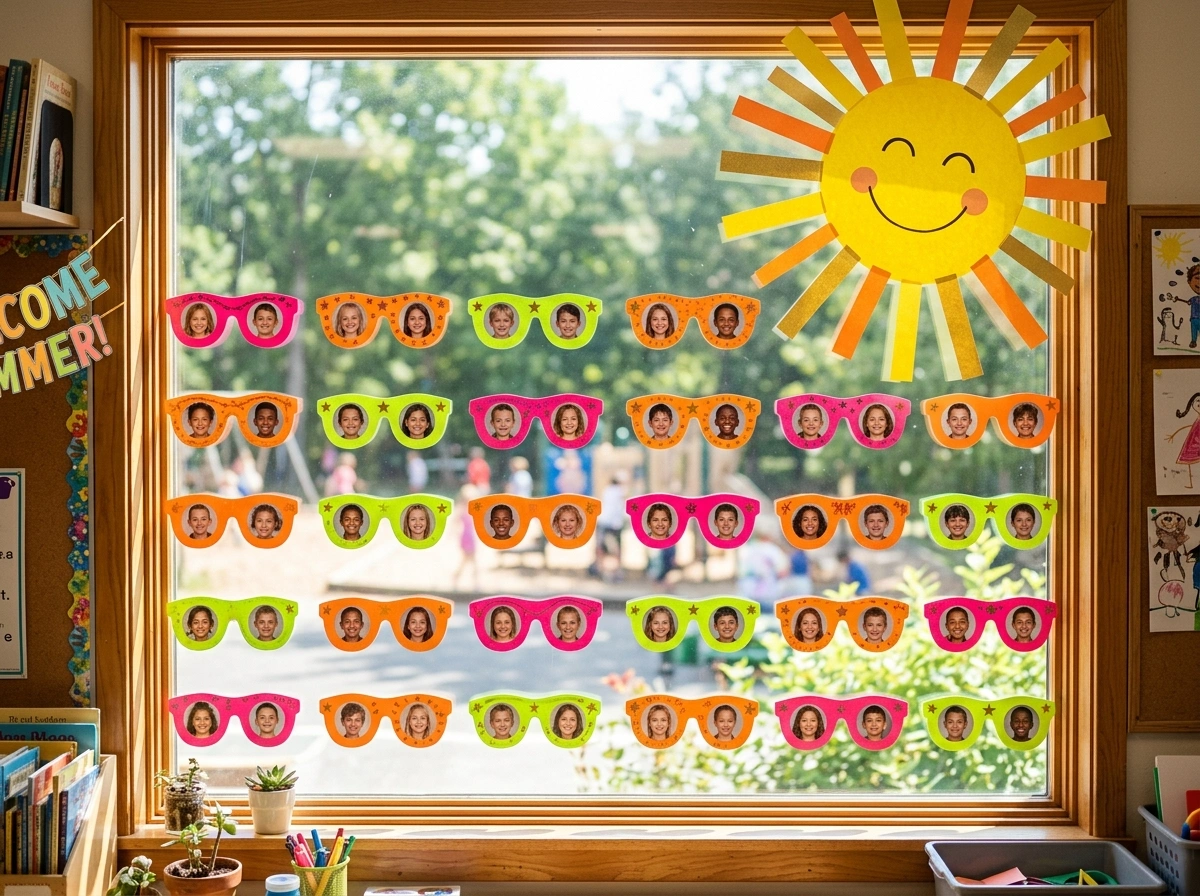
“Our Future is Bright” Neon Sunglasses
This window display is an absolute classic for a reason, and it is a major hit on teacher Pinterest boards. It features a giant, vibrant sun in the corner, with rows of oversized, neon-colored paper sunglasses drifting across the glass, each featuring a student’s photo or name in the lens reflection. It feels incredibly personal, celebratory, and fills the classroom with a sense of pride as the school year comes to a close.
To get started, cut out large sunglass frames using bright neon cardstock or poster board. Instead of leaving the lenses empty, use a shiny silver wrapping paper or light blue cellophane to give them a reflective, realistic look. You can print out black-and-white photos of your students and stick them directly in the center of each lens for a adorable, custom touch. The biggest pitfall here is using heavy poster board that falls off the glass; stick to lightweight construction paper and use heavy-duty double-sided window tape to keep them secure.
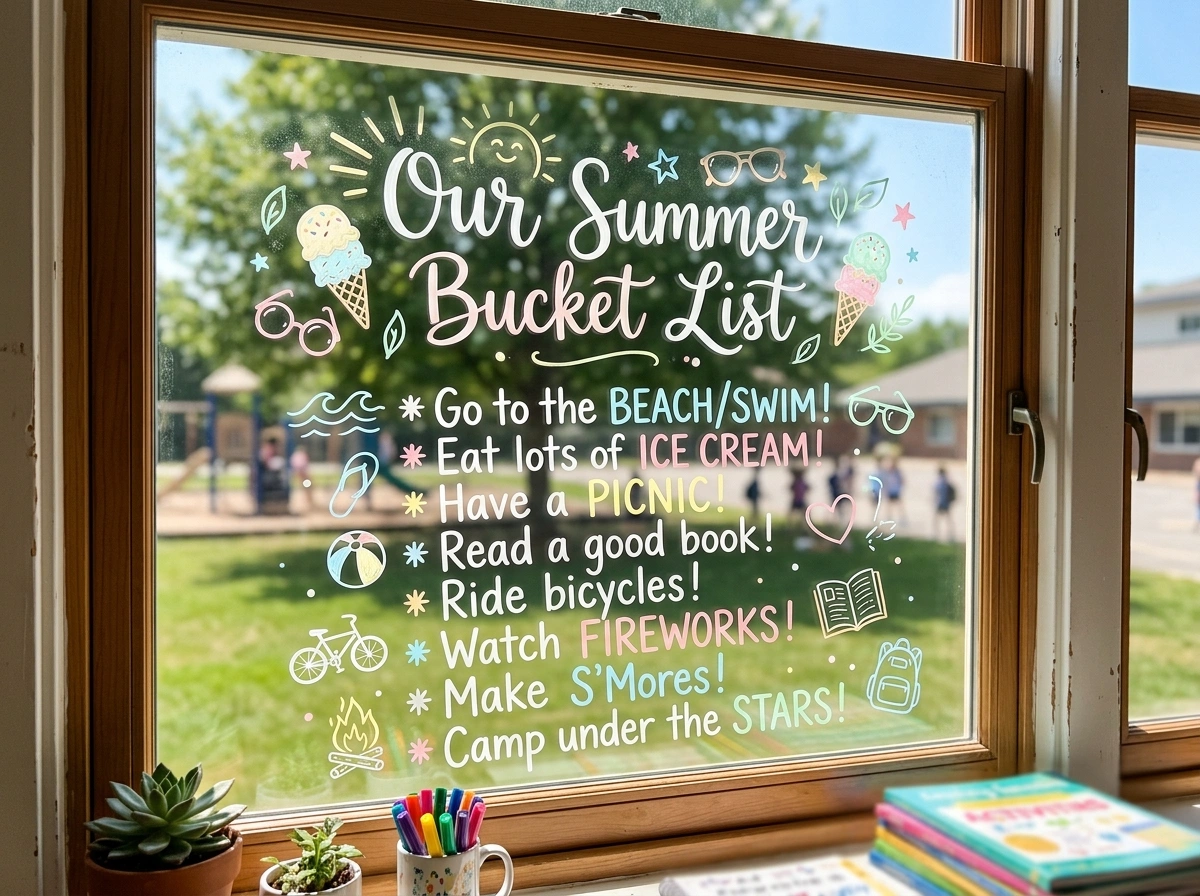
Chalk Marker Summer Bucket List
Sometimes, the best window decorations are the ones that don’t require any paper at all. This hand-drawn chalk marker display looks like something straight out of a cozy, modern neighborhood coffee shop. It features clean, whimsical typography, hand-illustrated ice cream cones, sunshine, and a bulleted “Summer Bucket List” that you can write together as a class. It is interactive, highly visual, and leaves your actual window glass completely open to let in maximum light.
I always recommend starting with high-quality liquid chalk markers in white and warm pastel tones like dusty rose, cream, and soft yellow. Before you start drawing, print out your text or illustrations on regular paper, tape them to the outside of the window facing in, and trace them from the inside for perfect lines. In my experience, trying to freehand typography directly onto glass usually ends up looking messy and hard to read. A pack of premium chalk markers will run you about $12, and the best part is they wipe completely clean with a damp microfiber cloth.
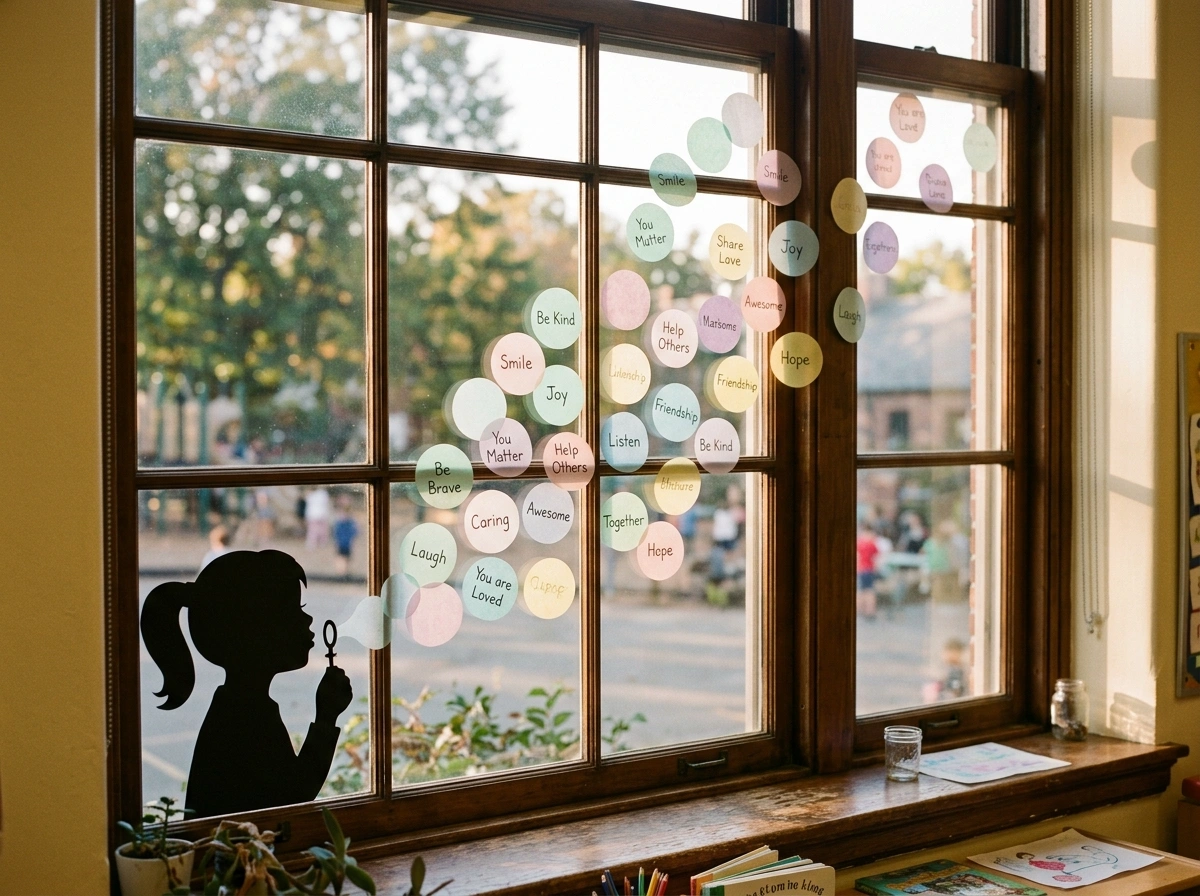
Blowing Bubbles of Kindness
This concept is incredibly sweet and interactive, focusing on community and positive reinforcement. The window display features a large black paper silhouette of a child blowing bubbles, with dozens of pastel-colored paper circles floating upwards across the window panes. Each bubble has a handwritten note from a student detailing a kind act a classmate did, or a favorite memory from the school year, catching the sun beautifully.
To put this together, draw or print a simple silhouette profile on black poster board and tape it to the bottom corner of your window frame. Cut out circles from soft pastel tissue paper or lightweight vellum, which diffuses the sunlight beautifully without blocking it. Have your kids write their memories or compliments directly onto the circles using a dark felt tip pen before taping them up. This works especially well if you want a beautiful classroom without spending hours on it, and it keeps your students highly engaged in the process.
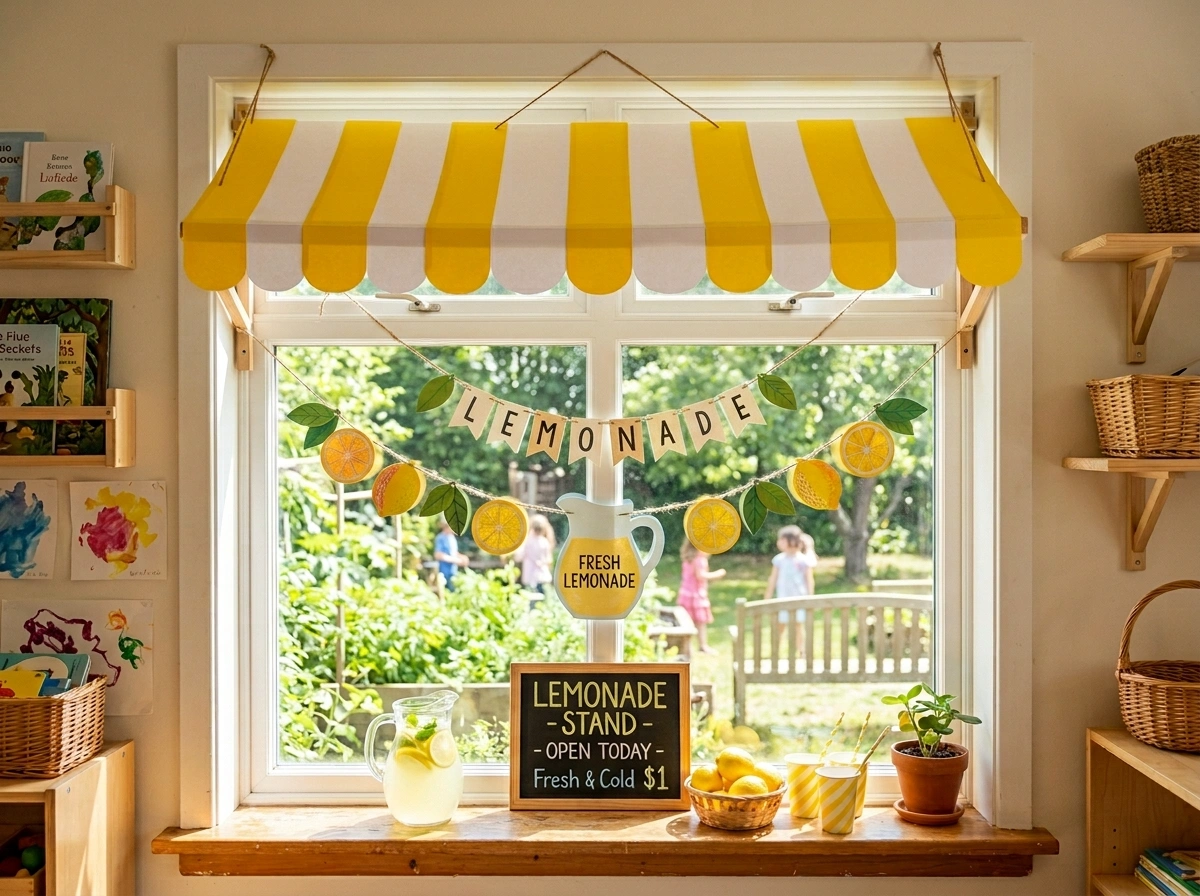
Sweet Summer Lemonade Stand
Nothing says summer quite like a cold glass of fresh lemonade, and this cheerful window design brings that exact feeling into your classroom. Picture a classic yellow-and-white striped awning at the top of the window frame, complete with hanging paper lemons, a pitcher cutout, and a bold banner that reads “Squeeze the Day.” It feels incredibly bright, fresh, and brings a wonderful pop of energy to the entire room.
You can easily build the 3D striped awning by folding lightweight cardstock accordion-style and securing it to the top window trim with temporary mounting tape. String together paper lemon slices—using yellow, white, and a touch of light green cardstock—along a piece of natural twine to create a rustic garland. To avoid a messy, cluttered look, keep the middle of the window relatively clear so the sun can still stream through and illuminate the yellow accents. You can put this entire look together for under $12 using basic craft store supplies.
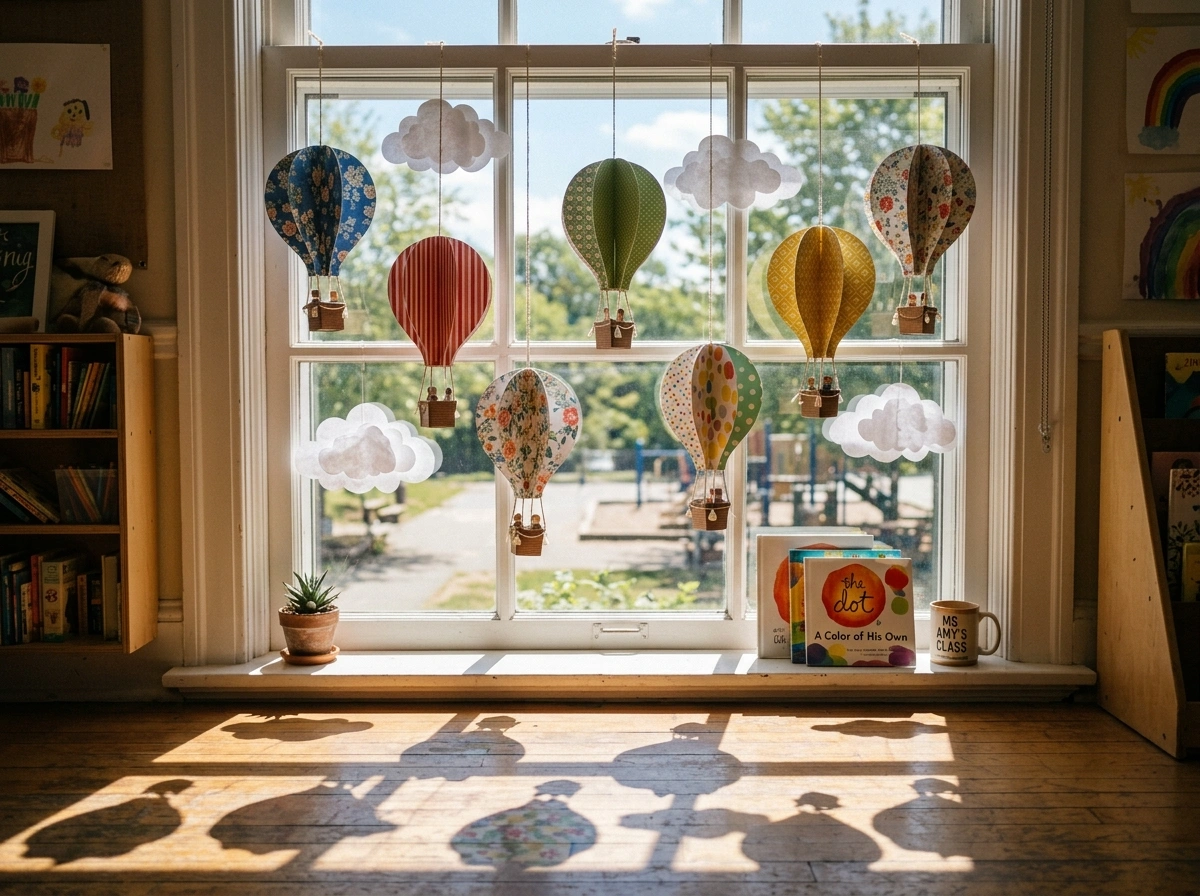
Flying High Hot Air Balloons
This display looks like a dream when the afternoon breeze catches the window area. It features dozens of colorful, three-dimensional paper hot air balloons drifting through fluffy, white cotton-ball clouds pasted across the glass. The balloons seem to float effortlessly, casting beautiful, patterned shadows across the room and giving the entire space a sense of wonder and adventure.
To create the 3D balloon effect, cut out three identical balloon shapes from patterned scrapbooking paper, fold them in half, and glue them back-to-back before pasting them flat against the window. Hang small paper baskets underneath each balloon using pieces of brown yarn. For the clouds, use lightweight white cardstock or stretched-out polyester fiberfill for a truly fluffy, realistic texture. A common mistake here is making the clouds too dense, which blocks out all your natural light; keep them airy and spaced out.
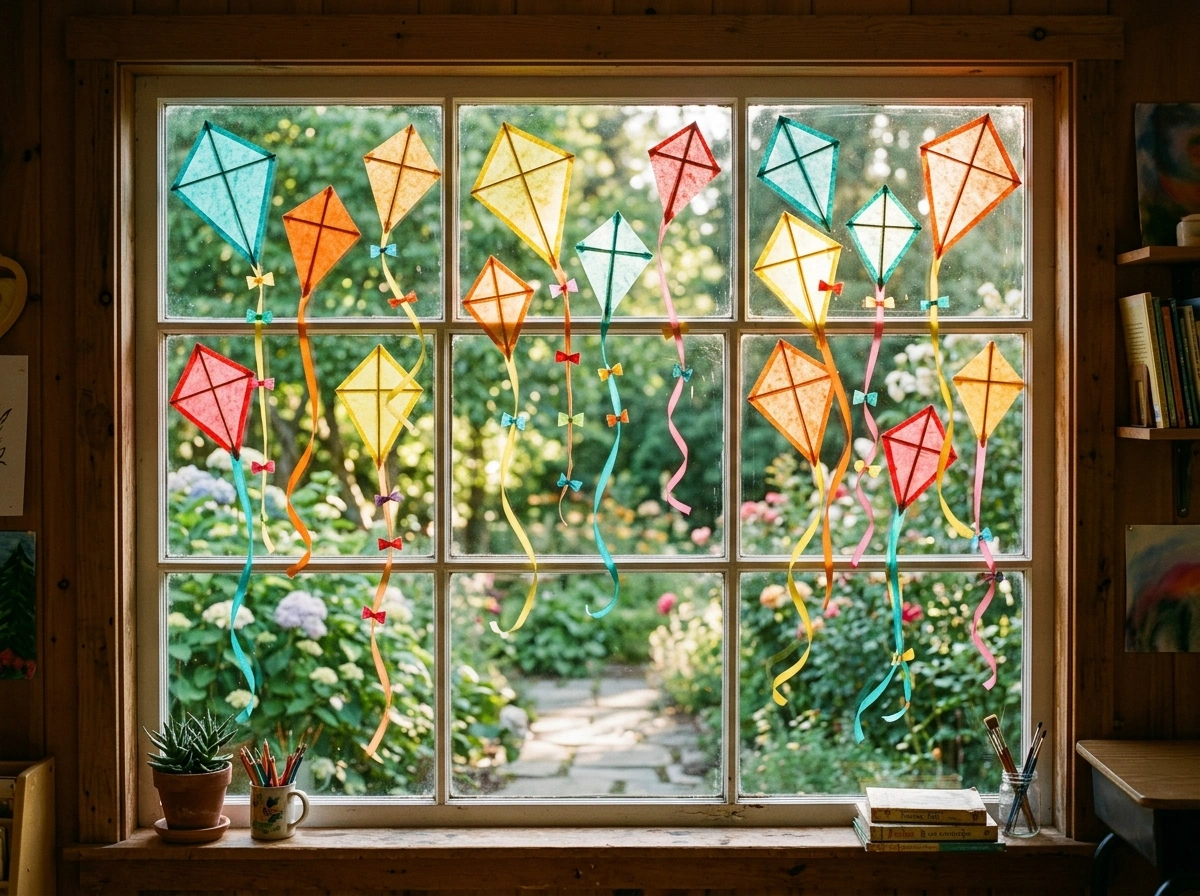
Soaring Into Summer Kites
Kites are the ultimate symbol of windy summer days, and they make for an incredibly dynamic, line-based window display that draws the eye upward. This setup features vibrant, diamond-shaped tissue paper kites sailing across the window panes, complete with long, winding ribbon tails adorned with colorful little paper bows. It feels cheerful, nostalgic, and incredibly light.
Start by constructing the kite frames using thin wooden skewers or black cardstock strips crossed over each other. Stretch bright tissue paper over the frames, letting the light filter through the translucent material to create a glowing effect. Tie actual satin or curling ribbon to the bottom of each kite, letting them dangle down the window naturally. To prevent the ribbon tails from tangling or getting caught in nearby heaters, anchor the bottom of the ribbons to the window sill with small pieces of clear tape.
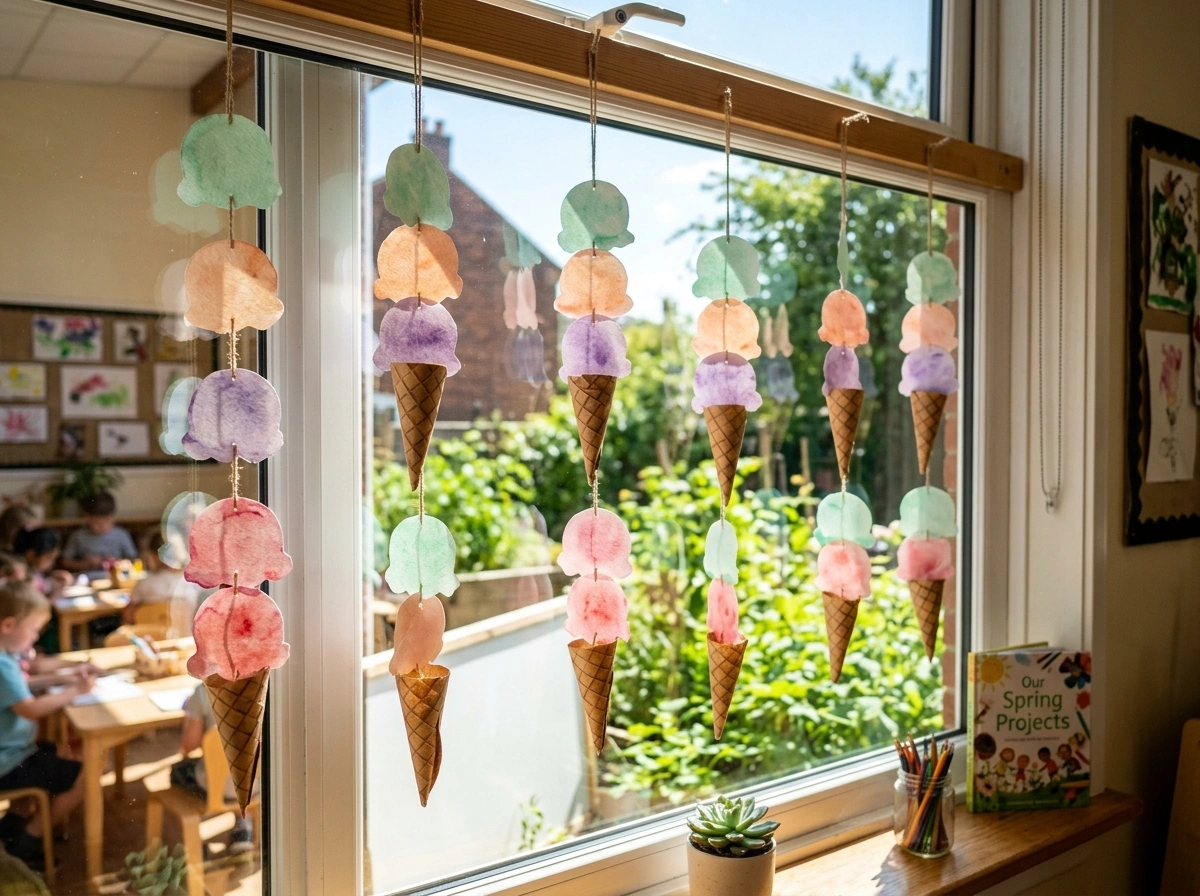
Ice Cream Cone Garland Cascade
This is a delightfully sweet and playful display that will have your students smiling every time they look at the window. It consists of multiple vertical garlands hanging down the glass, made of alternating pastel ice cream scoops and brown paper cones. The soft colors—think mint, peach, lavender, and strawberry pink—give the window a lovely, soft aesthetic that looks absolutely beautiful in the bright summer sun.
To keep this budget-friendly, use standard coffee filters dyed with watercolors for the ice cream scoops, which gives them a soft, textured, and realistic look. Cut out triangles from brown kraft paper, using a brown marker to draw diagonal grid lines to mimic waffle cones. Thread the scoops and cones onto a string of clear fishing line, spacing them out evenly so they appear to be cascading down the window. This is an incredibly affordable project, costing less than $8 for a massive, high-impact display.
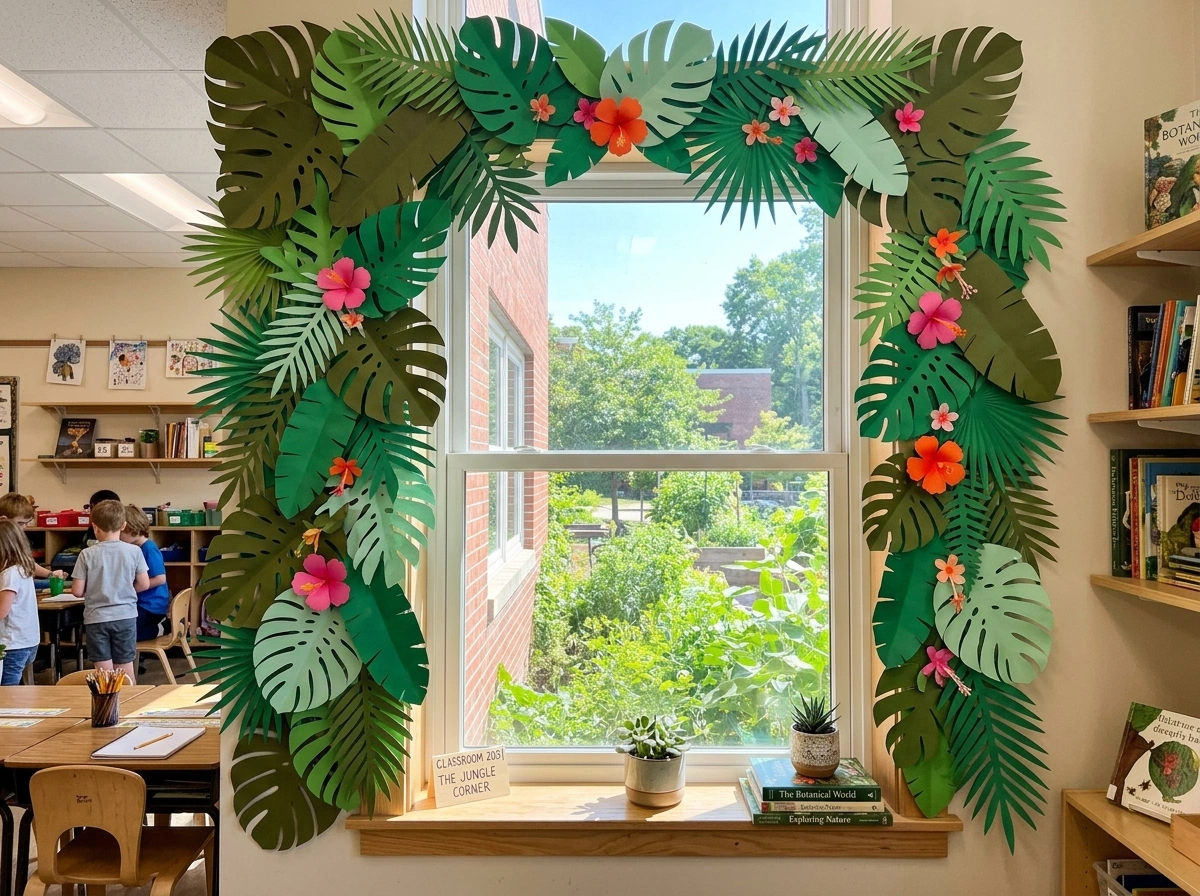
Tropical Palm Leaf Oasis
If you want a modern, leafy look that feels more like a relaxing botanical garden than a chaotic classroom, a tropical palm leaf oasis is the way to go. This window frame is lined with layered, oversized paper leaves in various shades of green—monstera, palm fronds, and banana leaves—with small pops of bright pink and orange hibiscus flowers peeking through. It is mature, beautiful, and does an amazing job of framing the view outside.
I always recommend starting with a variety of green cardstock, including deep olive, bright emerald, and soft mint, to give the foliage depth. Use a leaf template to trace and cut out your shapes, then fold them slightly down the center crease to give them a realistic, three-dimensional bend. Secure them along the borders of your window, leaving the center glass completely open. In my experience, the biggest mistake people make is using tape that melts in the sun; use high-temperature glue dots or hook-and-loop fasteners to ensure your leaves don’t slide down the glass.
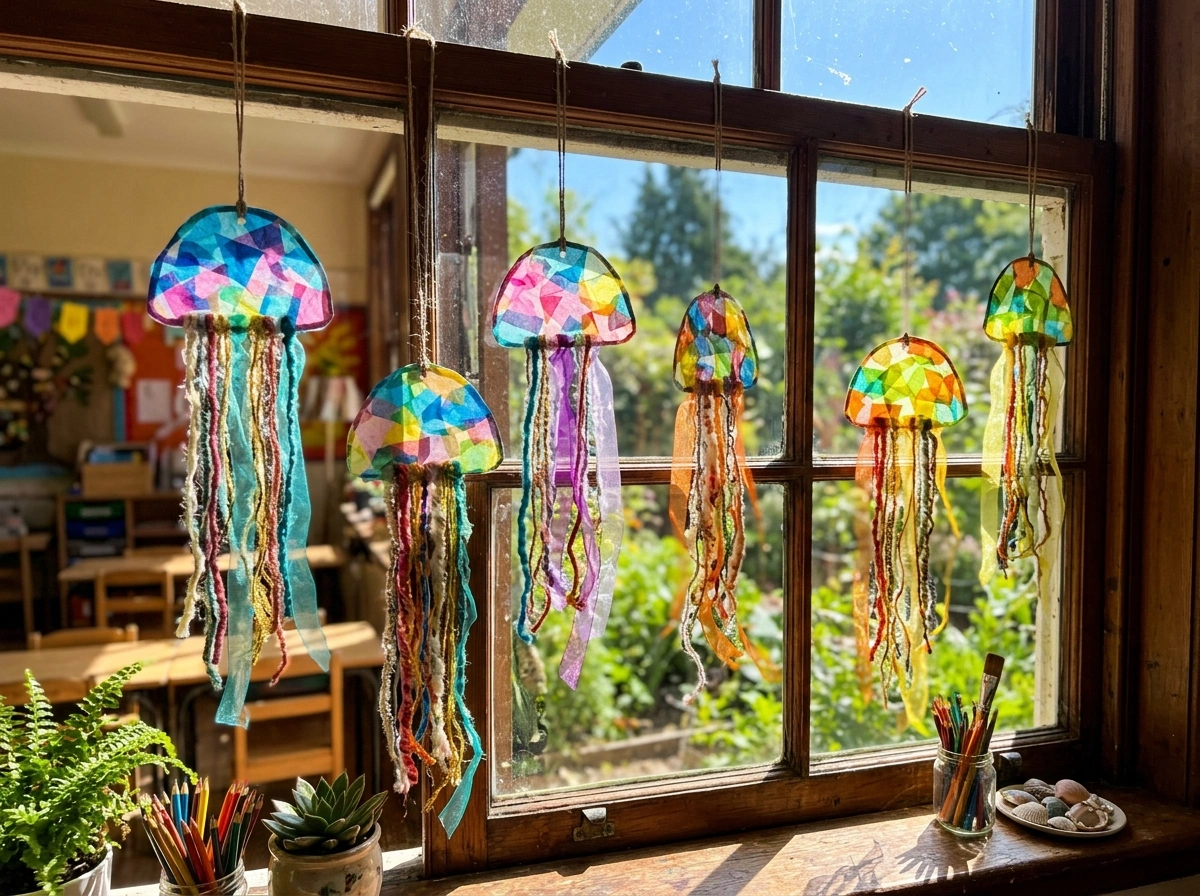
Stained Glass Jellyfish Drift
This idea is incredibly magical when the sun shines directly through the window panes. It features translucent, stained-glass style jellyfish that look like they are drifting through a glowing sea. The bell of the jellyfish is made of laminated tissue paper, while the tentacles are made of shimmering yarns, metallic threads, and sheer ribbons that sway gently with the room’s airflow.
To make these, cut out half-circle domes from clear contact paper, cover them with overlapping scraps of colored tissue paper, and seal them with another layer of contact paper. Punch small holes along the bottom edge and tie various textures of yarn and ribbon through them. Hang them at different heights close to the glass. What I personally love about this look is that it uses up all your scrap yarn and ribbon from previous projects, making it a fantastic, zero-waste classroom decor piece.
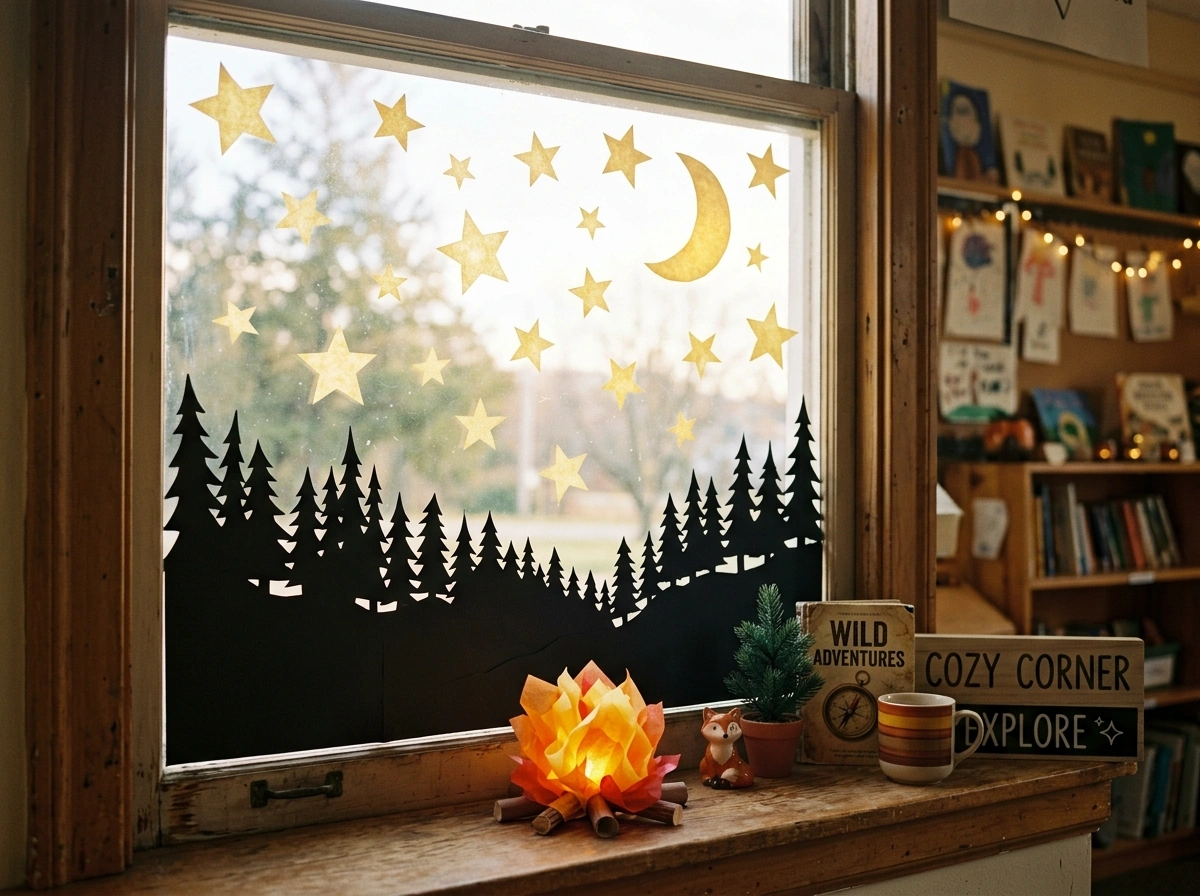
Camping Under the Summer Stars
Perfect for an end-of-year camping theme or a summer reading challenge, this display brings the cozy magic of the great outdoors inside. It features a dark forest skyline silhouette along the bottom of the window, with a glowing paper campfire and a sky filled with glowing yellow stars and a large crescent moon. It feels adventurous, cozy, and incredibly comforting during quiet reading times.
Cut your forest pine trees from thick black butcher paper to create a solid, crisp horizon line against the glass. For the stars and moon, use a high-visibility yellow or gold vellum paper that catches the sun and looks like it is glowing from within. You can add a small paper tent silhouette near the campfire to complete the scene. Keep your budget low by using scrap butcher paper and construction paper, which should cost you next to nothing if you utilize your school’s supply room.
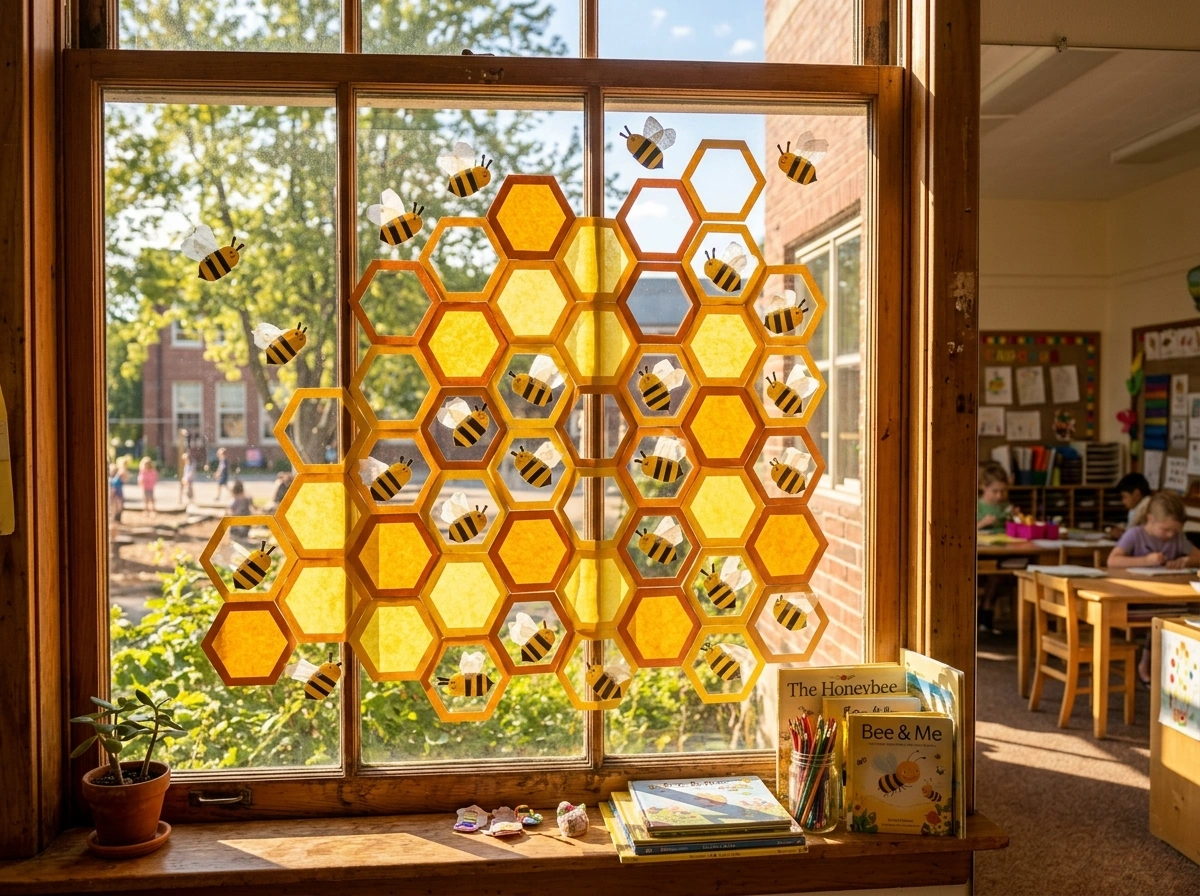
Bee-utiful Summer Hive
This sweet, honey-themed window display is perfect for younger elementary classrooms. It features a large, rustic honeycomb pattern made of yellow and orange paper hexagons stretching across the glass, populated by cute, busy paper bees with your students’ names written on them. It feels incredibly warm, industrious, and serves as a lovely metaphor for how hard your “hive” has worked all year.
To make the honeycomb look neat, print a hexagon template and cut your shapes from yellow, amber, and light orange cardstock. Leave some hexagons hollow and fill others with translucent yellow tissue paper to let the light shine through unevenly, mimicking real honey. Attach small cardstock bees with wax paper wings that shimmer in the sun. A lot of people overlook this detail, but angling the bees in different directions makes the entire window look dynamic and full of life.
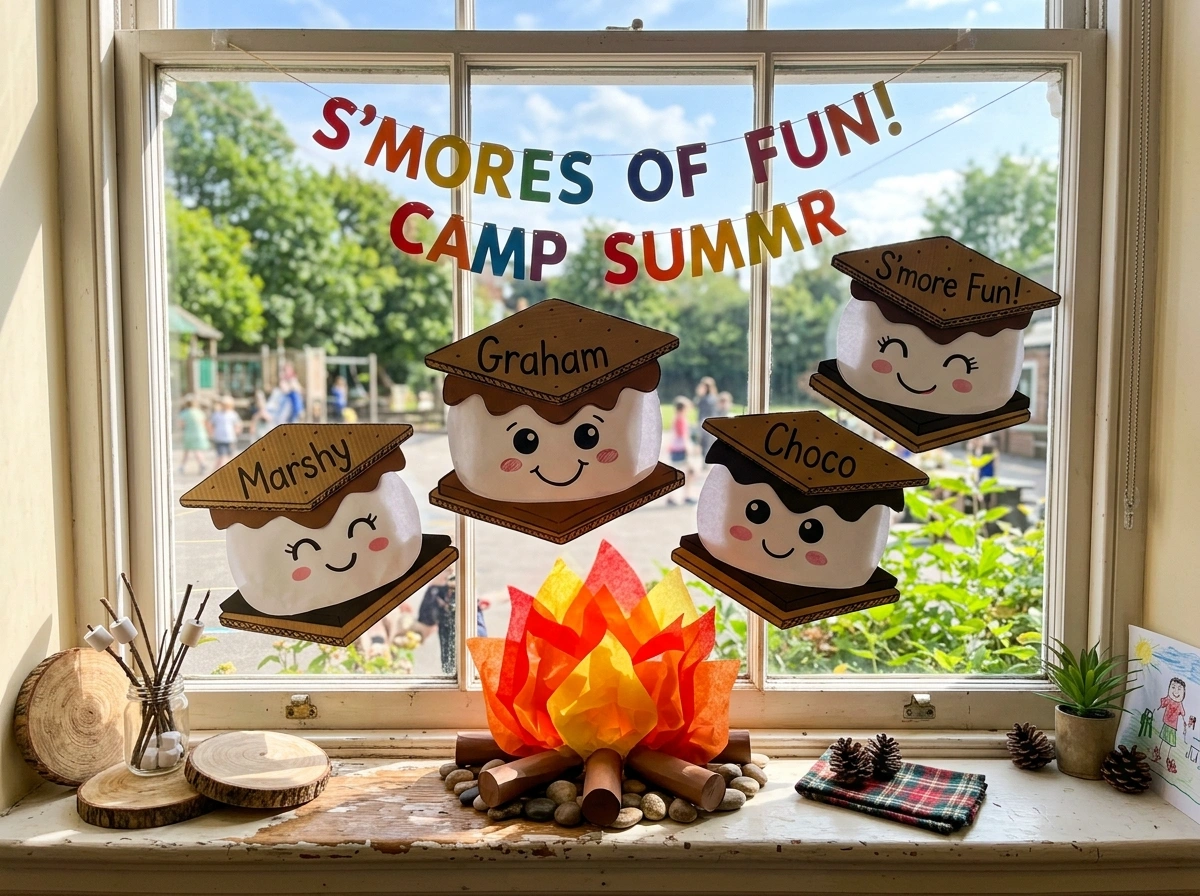
S’more Learning Summer Camp
This playful, nostalgic window setup centers around everyone’s favorite summer treat: s’mores! It features giant, smiling cartoon s’mores made of brown cardboard graham crackers, white paper marshmallows, and dark chocolate drips, all gathered around a cozy paper campfire. It is highly engaging, whimsical, and adds a massive dose of fun to the classroom environment.
To recreate this, use recycled cardboard boxes for the graham crackers to give them a realistic, sturdy texture, and use a brown marker to dot the classic cracker holes. Layer white butcher paper for the fluffy marshmallow layer and dark brown construction paper for the melting chocolate. Arrange them along the window sill as if they are sitting around a fire made of red, orange, and yellow tissue paper. This is a brilliant way to recycle old shipping boxes while making something absolutely adorable.
Bursting Sunflower Field
Sunflowers are the absolute queens of summer florals, and a window filled with them is bound to catch the eye of anyone walking by. This display features giant, layered yellow crepe-paper sunflowers climbing up the sides of the window panes, complete with textured brown seed centers and rich green leaves. It feels incredibly bright, positive, and instantly lifts the mood of the room.
To get that beautiful, ruffled sunflower texture, use yellow crepe paper streamers instead of flat cardstock for the petals, gluing them in concentric circles around a brown cardstock base. For the centers, glue actual dried coffee grounds or dark brown felt scraps to the paper to give them a realistic, touchable texture. In my experience, the biggest mistake is making the flowers too small; go big and let them overlap the window frames for a lush, overgrown garden effect.
Rainbow Rain of Joy
If you want a classic, vibrant display that appeals to all ages, a rainbow rain design is perfect. It features a giant, fluffy white paper cloud at the top of the window, with long strands of colorful, transparent plastic or paper raindrops cascading down the glass. The raindrops catch and refract the sunlight, throwing beautiful little prisms of color all over your classroom walls.

To make the raindrops, cut teardrop shapes from colored plastic folders or translucent acetate sheets in a classic rainbow sequence. String them together on clear monofilament line, leaving about two inches of space between each drop so they look like they are falling. Hang the lines from the top window frame, hidden behind your large cardstock cloud. This works especially well if you want a clean, organized look that still packs a massive visual punch.
Conclusion
Decorating your classroom window for the summer doesn’t require a massive budget or hours of tedious crafting. At the end of the day, style in the classroom is about creating a space where both you and your students feel happy, comfortable, and inspired to finish the year strong. It isn’t about perfection; even a simple string of paper lemons or a few watercolor suncatchers can completely change the energy of your room.
I always recommend starting with just one or two simple ideas from this list and seeing how the light changes your space. You might be surprised by how much a little bit of color on the glass can brighten up a dreary afternoon of grading or bring a smile to a student’s face.
Which of these summer classroom window ideas would you actually try in your room first? I’d genuinely love to know—leave a comment below and let’s chat!
Q: How do I attach decorations to classroom windows without leaving residue?
The absolute best tool for this is clear painter’s tape or blue painter’s tape hidden behind your paper cutouts. It holds up well to temperature changes and peels away cleanly without leaving that sticky, gooey residue that standard tape leaves behind. For heavier items, look for removable heavy-duty gel dots designed specifically for glass.
Q: What are the best fade-resistant materials for sun-facing classroom windows?
If your window gets direct, harsh sunlight all day, standard construction paper will fade within a week. Instead, opt for cardstock labeled “acid-free” or “fade-resistant,” or use colored plastic sheets, acetate, and tissue paper. Tissue paper will eventually fade, but because it is so cheap, it is easy and inexpensive to replace if needed.
Q: How can I involve my students in decorating our summer window?
Many of these ideas are perfect for student collaboration! For the Watercolor Suncatcher Garden or the Stained Glass Jellyfish, let your students cut and layer the tissue paper onto the contact paper. For the Sunglasses or Kindness Bubbles displays, they can write their own names, memories, or draw their own designs directly onto the pieces before you hang them up.
Q: What is the cheapest way to create a high-impact window display?
Using coffee filters dyed with liquid watercolors or food coloring is incredibly cheap and creates a gorgeous, stained-glass effect. You can also use butcher paper from your school’s workroom to create large silhouettes, which costs absolutely nothing and looks highly professional from both the inside and outside of the building.
Q: How do I stop condensation from ruining paper window decorations?
If your classroom windows get damp from morning humidity or air conditioning differences, avoid putting paper directly against the glass. Instead, mount your paper decorations to a thin plastic sheet or laminate them first, or hang them an inch away from the glass using clear fishing line attached to the upper window frame.