
18 Simple DIY Backyard Fire Pits (Surprisingly Easy)
There is nothing quite like the feeling of watching a fire crackle as the sun goes down, holding a warm mug of cider, and realizing you don’t have to leave your own home to feel like you’re on a cozy getaway. But if you have ever looked up professional backyard landscaping designs, you have probably felt instantly discouraged by the thousands of dollars and heavy machinery required to build a simple outdoor fire zone. The truth is, you do not need a massive budget or a degree in masonry to create a beautiful, safe, and inviting outdoor gathering spot.
In my experience, the biggest mistake people make is thinking that a DIY project has to look “cheap” if it is done quickly. With the right choice of materials—like clean-cut paving stones, simple pea gravel, or textured fieldstone—you can build a stunning focal point in a single afternoon. If you have been wanting to make your backyard feel more welcoming without spending a fortune, this guide is for you. Below, we are going to walk through 18 simple backyard fire pit ideas that are surprisingly easy to put together, along with the exact steps and practical advice you need to get them done safely this weekend.
The Classic Stacked Paver Ring
What I personally love about this design is how incredibly clean and orderly it looks without requiring any messy wet mortar. The natural grey tones of concrete paving stones contrast beautifully with the bright green of a fresh lawn or the deep brown of a mulched garden bed. It creates a defined, circular hub that instantly invites people to pull up a chair, making your backyard feel like a cozy, structured retreat. This setup is perfect for weekend family gatherings and casual marshmallow-roasting sessions under the stars.
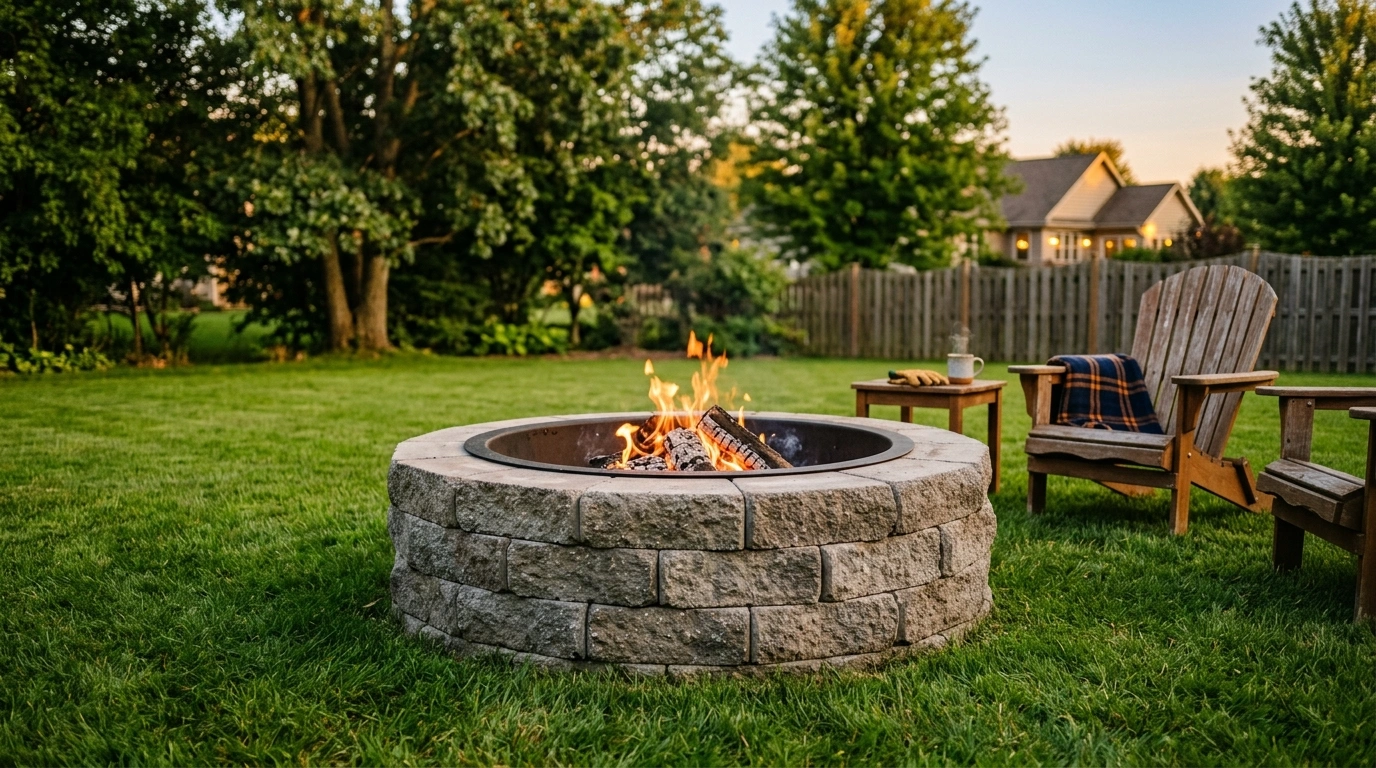
To recreate this at home, start by clearing out a circle of grass slightly wider than your planned pit, making sure the ground is completely level. I always recommend putting down a thin layer of leveling sand first, as a level foundation prevents the blocks from shifting or leaning over time. You will want to use heavy, curved retaining wall blocks (often called “wedge” blocks) and stack them in three to four staggered rings. To make this safe and long-lasting, insert a circular steel fire ring inside the blocks to protect the concrete from direct heat, which can otherwise cause the stones to crack.
Estimated Cost: $120 – $180
Time Commitment: 2–3 hours
The Cozy Pea Gravel Oasis
This setup is perfect if you want to turn a patchy, unused corner of your yard into a dedicated relaxation zone without digging a massive hole. The soft, crunching sound of light grey pea gravel underfoot instantly mimics the vibe of a high-end European cottage garden. When you place a simple, dark cast-iron fire bowl right in the center of the gravel circle, it feels intentional, grounded, and incredibly relaxing to look at even when the fire is not lit.
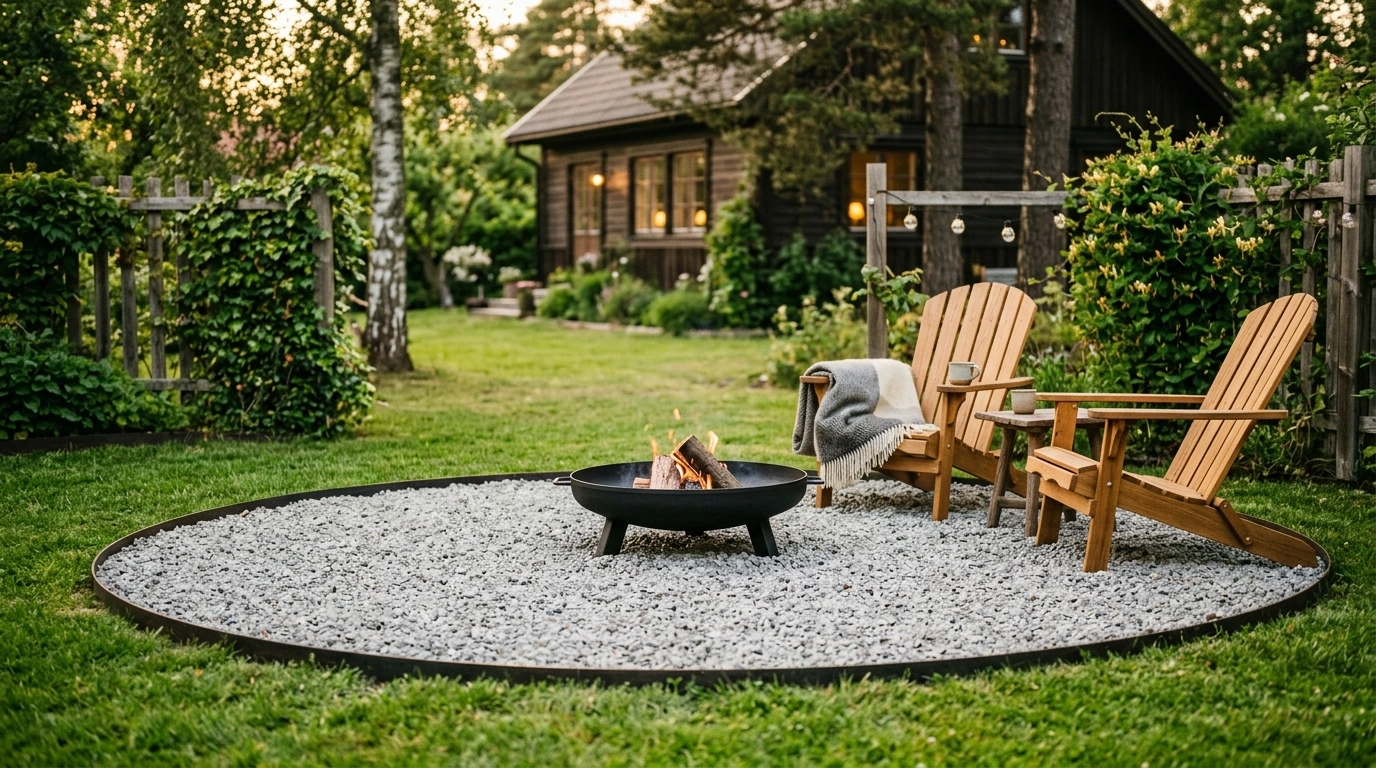
A lot of people overlook this detail, but it changes the entire outfit of your yard: always lay down a heavy-duty landscaping weed barrier before pouring your gravel. If you skip this step, you will find yourself pulling stubborn weeds out of your seating area instead of actually enjoying your fires. Use simple plastic or metal garden edging to keep the pea gravel contained in a perfect circle, then pour about two inches of gravel over the barrier. Finish the space by adding a pair of wooden chairs and a classic black metal fire bowl.
Estimated Cost: $100 – $160
Time Commitment: 3 hours
The Sunken Flagstone Fire Pit
If you prefer a rugged, old-world look that feels like it grew naturally out of your yard, a sunken flagstone pit is an incredible choice. Because the fire sits lower to the ground, it is highly protected from the wind and throws off a beautiful, low-level warmth that keeps your feet warm on chilly nights. The uneven, organic shapes of natural flagstone give the entire area a rustic, forest-dwelling charm that looks better and better as the stone weathers.
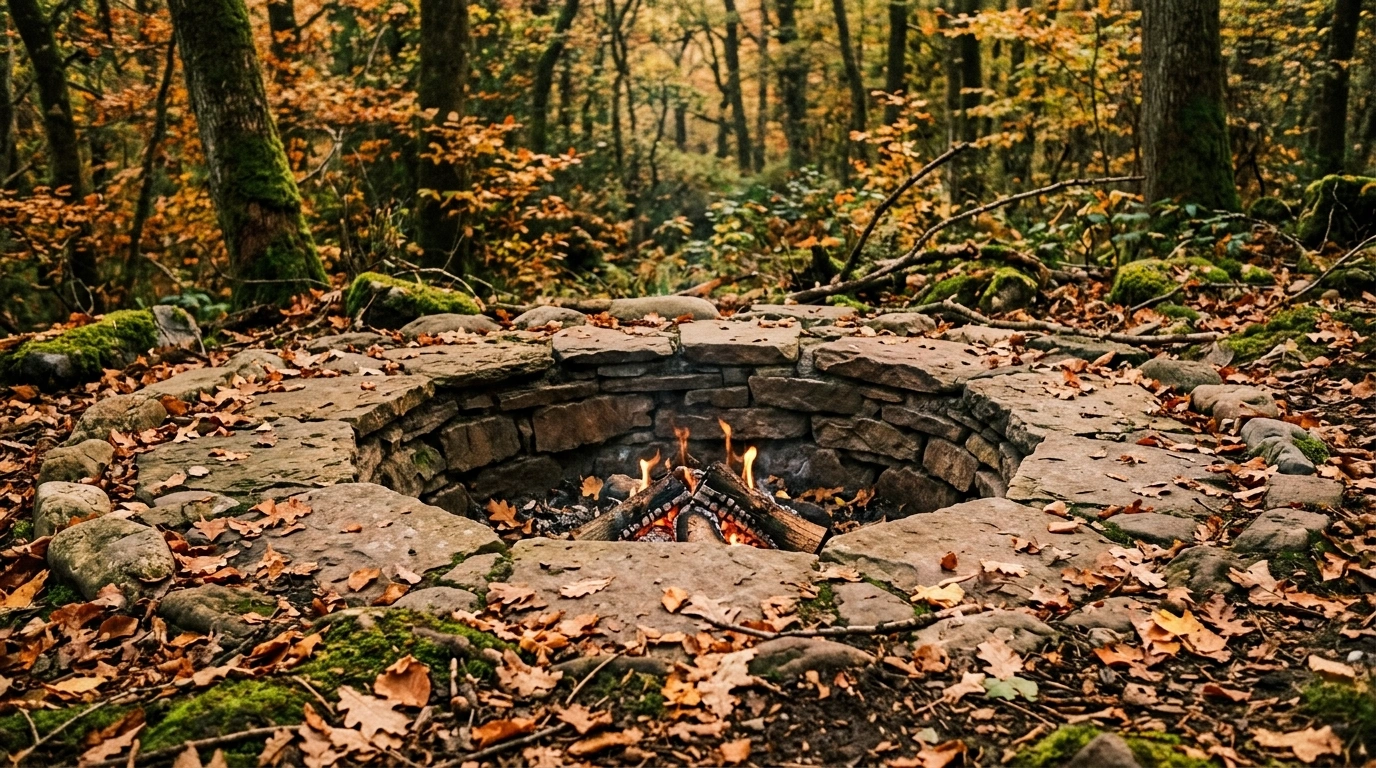
To build this safely, you will need to dig a circular pit about twelve inches deep, making sure to avoid any underground utility lines. Line the bottom with a thick layer of crushed gravel for excellent drainage, which prevents water from pooling in your pit during heavy rains. Line the inner walls of the dug-out hole with heavy, flat-faced stones or thick firebricks, then lay wide, flat flagstones around the top edge to create a clean, safe border. A common mistake here is neglecting drainage, so make sure your gravel layer is deep enough to handle local rainfall.
Estimated Cost: $80 – $150
Time Commitment: 4–5 hours
The Upcycled Industrial Drum Pit
For those who love a clever, sustainable design with an industrial edge, using a repurposed washing machine drum is an absolute game-changer. What makes this so brilliant is that the metal drum is covered in hundreds of tiny ventilation holes that draw in oxygen, creating an incredibly hot, clean-burning, and virtually smokeless fire. The metal glows a warm, vibrant orange through the perforations at night, which looks absolutely mesmerizing in a dark backyard.
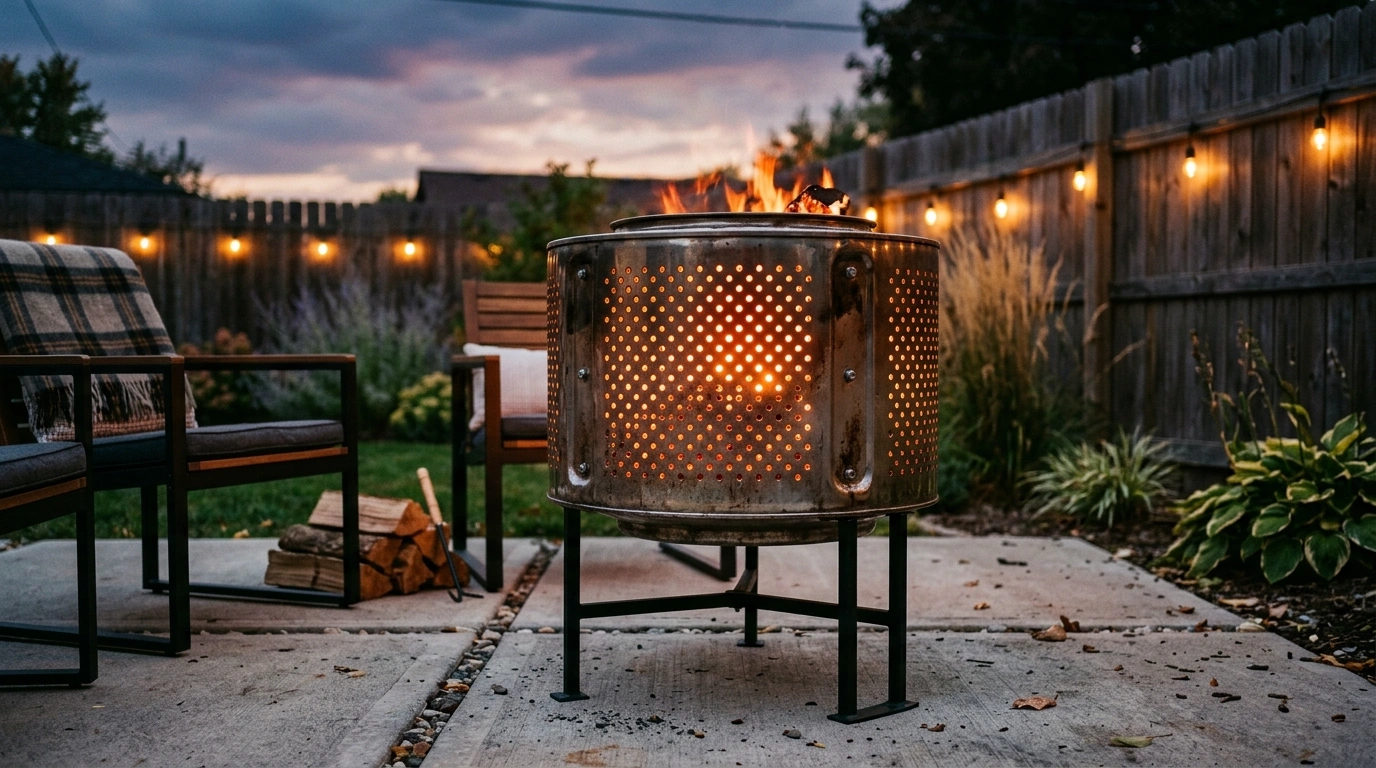
You can often find old washing machine drums at local scrap yards or online classifieds for next to nothing. Once you have salvaged one, make sure to remove all plastic parts, wires, and rubber gaskets, leaving only the bare stainless steel tub. To keep it stable and elevated off the grass, you can bolt three or four simple metal legs to the bottom, or set the drum securely on top of a few flat concrete pavers. This is a brilliant, budget-friendly alternative for anyone who wants a modern-looking, highly efficient fire pit without the heavy lifting of stone masonry.
Estimated Cost: $20 – $50
Time Commitment: 1–2 hours
The Modern Square Paver Grid
If your home has clean lines and a contemporary layout, a circular, rustic fire pit can sometimes feel a bit out of place. This modern square design uses dark charcoal concrete pavers arranged in a sharp, geometric grid to create a sleek, architectural focal point. It feels incredibly clean, spacious, and sophisticated, working especially well next to a modern deck or a concrete patio.
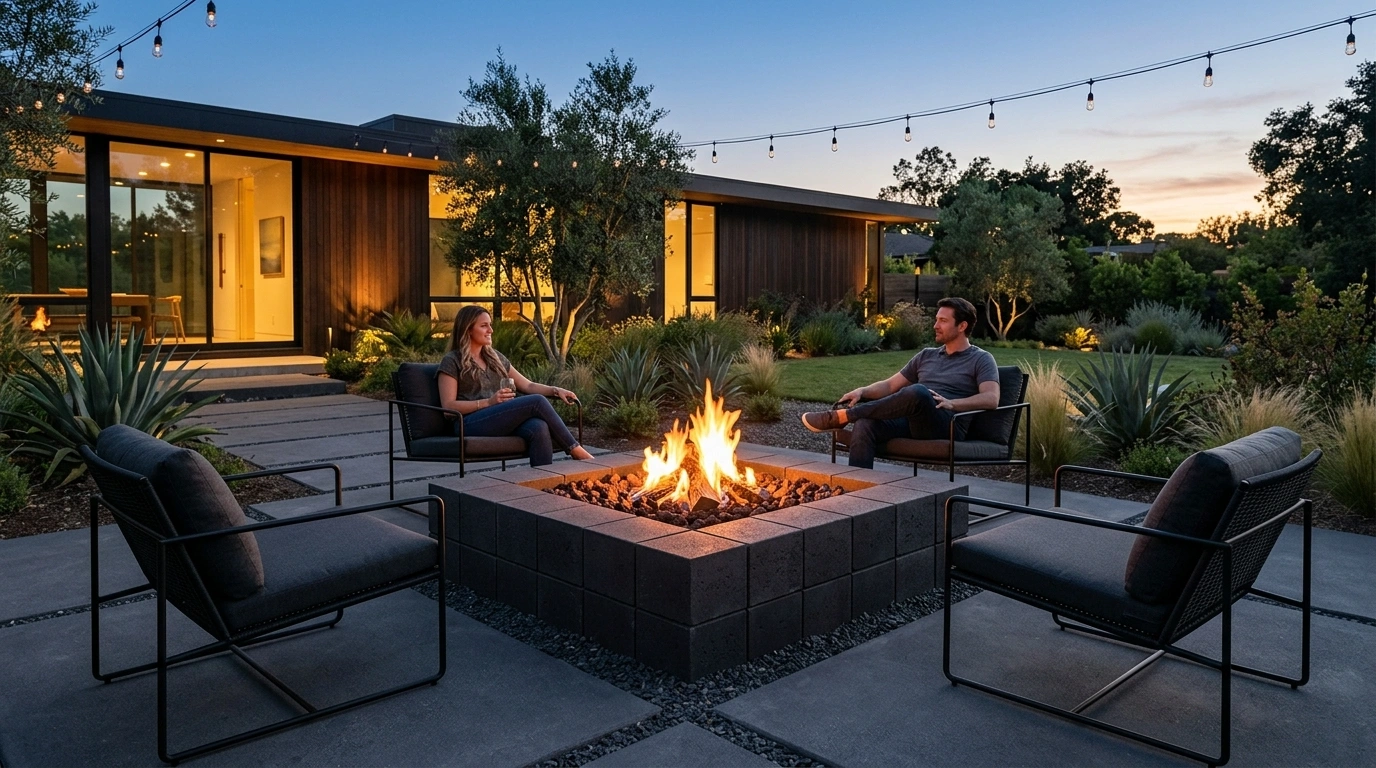
I always recommend starting with a layout map using stakes and string to make sure your square edges are perfectly straight and square. Use large, flat, square concrete pavers to create a clean floor grid, leaving an open square in the center where your fire ring will sit. Build up the walls of the central pit using rectangular concrete wall blocks, securing them together with heavy-duty outdoor construction adhesive for stability. To keep the look cohesive, use neutral, dark grey or beige tones and pair the space with minimalist black metal chairs.
Estimated Cost: $200 – $280
Time Commitment: 4 hours
The Tree-Ring Block Circle
This is one of the easiest hacks in the DIY world, and the results look remarkably professional. By using curved concrete blocks designed to go around tree trunks, you can create a perfectly circular, interlocking fire pit in less than an hour. The textured, natural stone-look faces of these blocks give the pit a classic, rugged appearance that fits beautifully into any traditional suburban backyard.
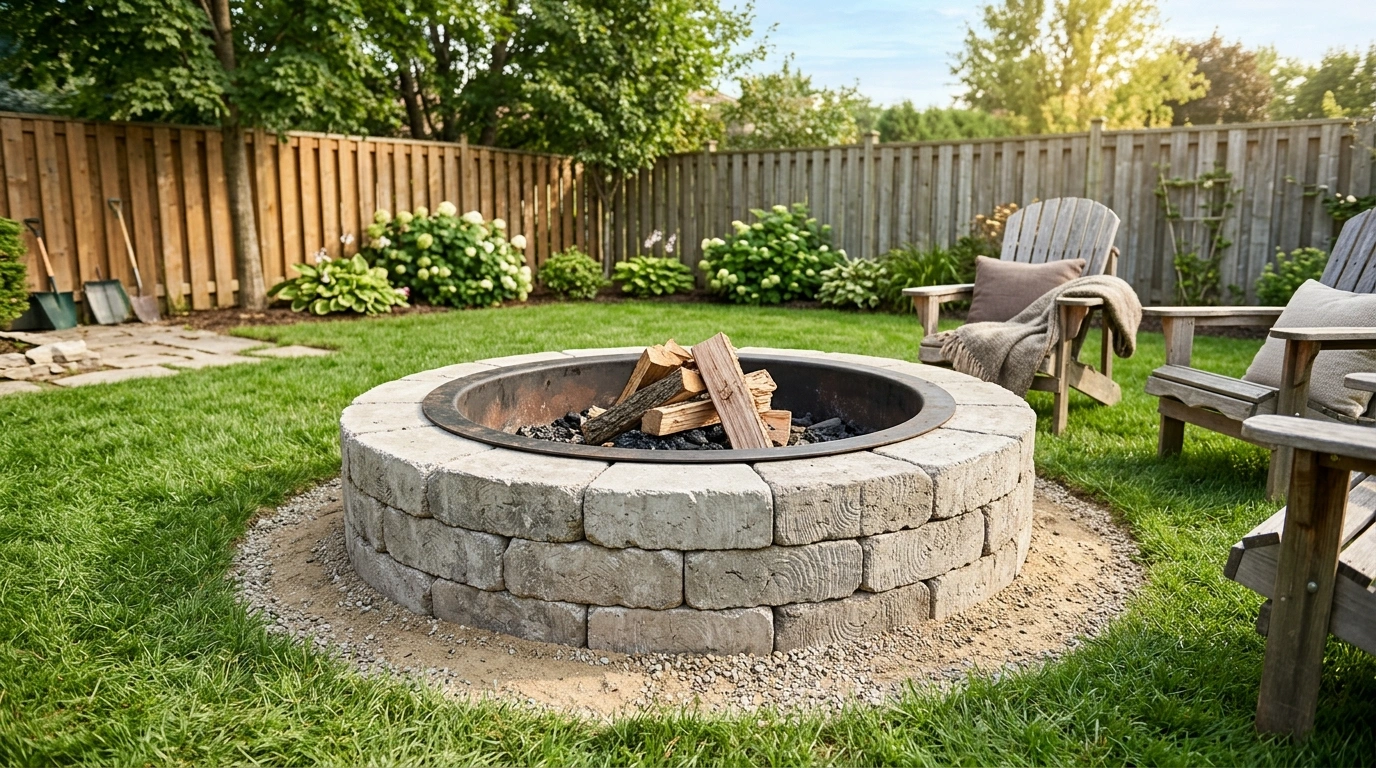
Because these blocks are designed to interlock naturally, you do not need to worry about measuring complex angles or cutting stone. Simply clear a circular area, lay down a level layer of sand, and assemble the first ring of blocks. Stack a second and third row directly on top, offsetting the joints of the previous layer for structural strength. I always recommend placing a heavy-duty steel insert inside to shield the blocks from direct flame exposure, which prevents any crumbling or cracking over the winter months.
Estimated Cost: $70 – $110
Time Commitment: 1 hour
The Cozy Tabletop Fire Bowl
You do not need a massive grassy yard to enjoy the magic of a flickering fire. If you only have a small wooden deck, a concrete patio, or a cozy balcony, a tabletop fire bowl offers all the ambiance without any of the smoke, ash, or space constraints. It looks incredibly sleek, sits beautifully as a centerpiece on an outdoor table, and provides a lovely, intimate glow for quiet evenings.
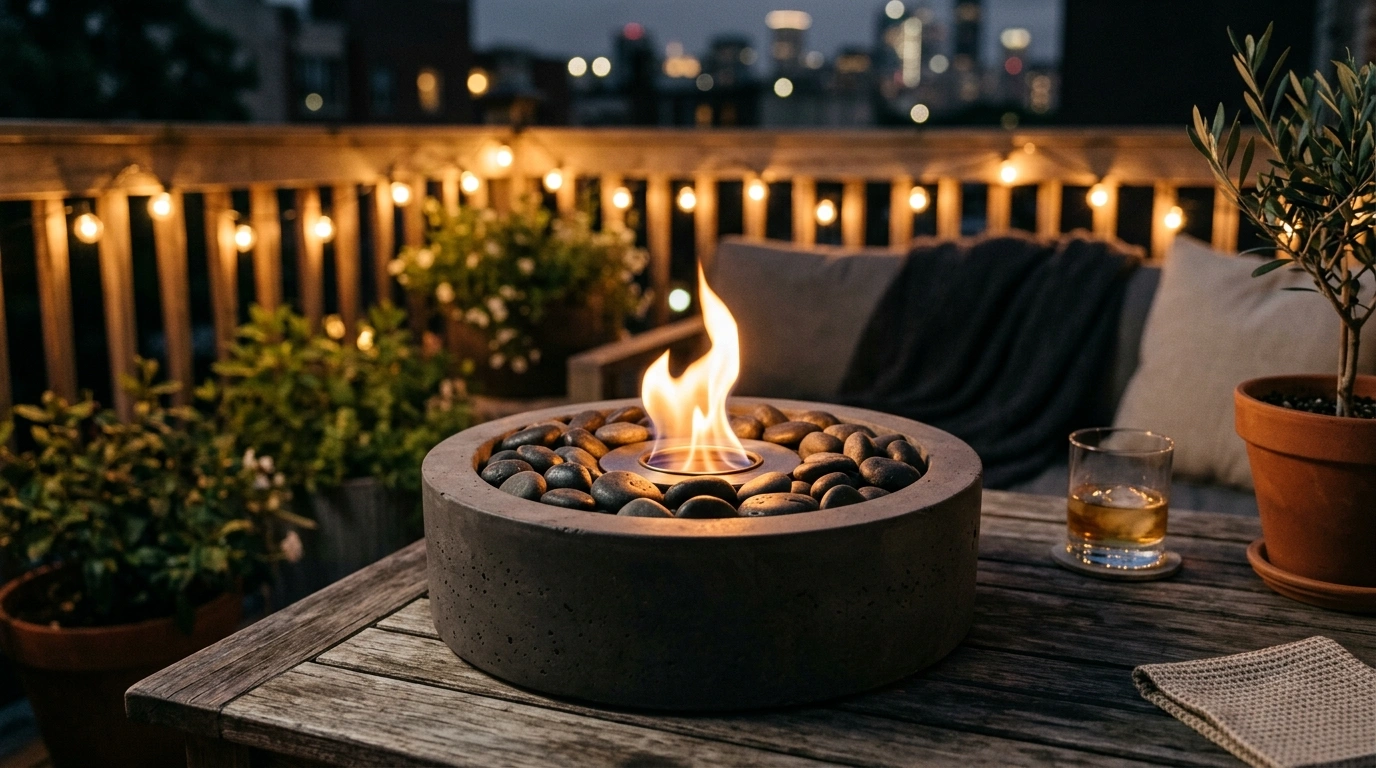
To make one yourself, find a large, weather-resistant planter bowl made of concrete or thick composite material. Fill the bottom half with cheap lava rock or empty soda cans to save on weight, then place a clean-burning gel fuel canister or a small bioethanol burner right in the center. Surround the burner with smooth, grey beach pebbles or decorative river rocks, leaving the top of the canister clear. It is a highly affordable, safe, and smoke-free way to bring cozy fire-side vibes to the smallest of outdoor spaces.
Estimated Cost: $35 – $60
Time Commitment: 30 minutes
The Traditional Red Brick Hearth
There is something deeply nostalgic and comforting about the look of classic red clay bricks. A brick fire pit brings a warm, timeless, and slightly historic feel to your outdoor space, reminiscent of old-school brick fireplaces and cozy autumn cabins. The rich terracotta and crimson tones of the brick look particularly beautiful when surrounded by green grass, fallen leaves, and rustic wooden benches.
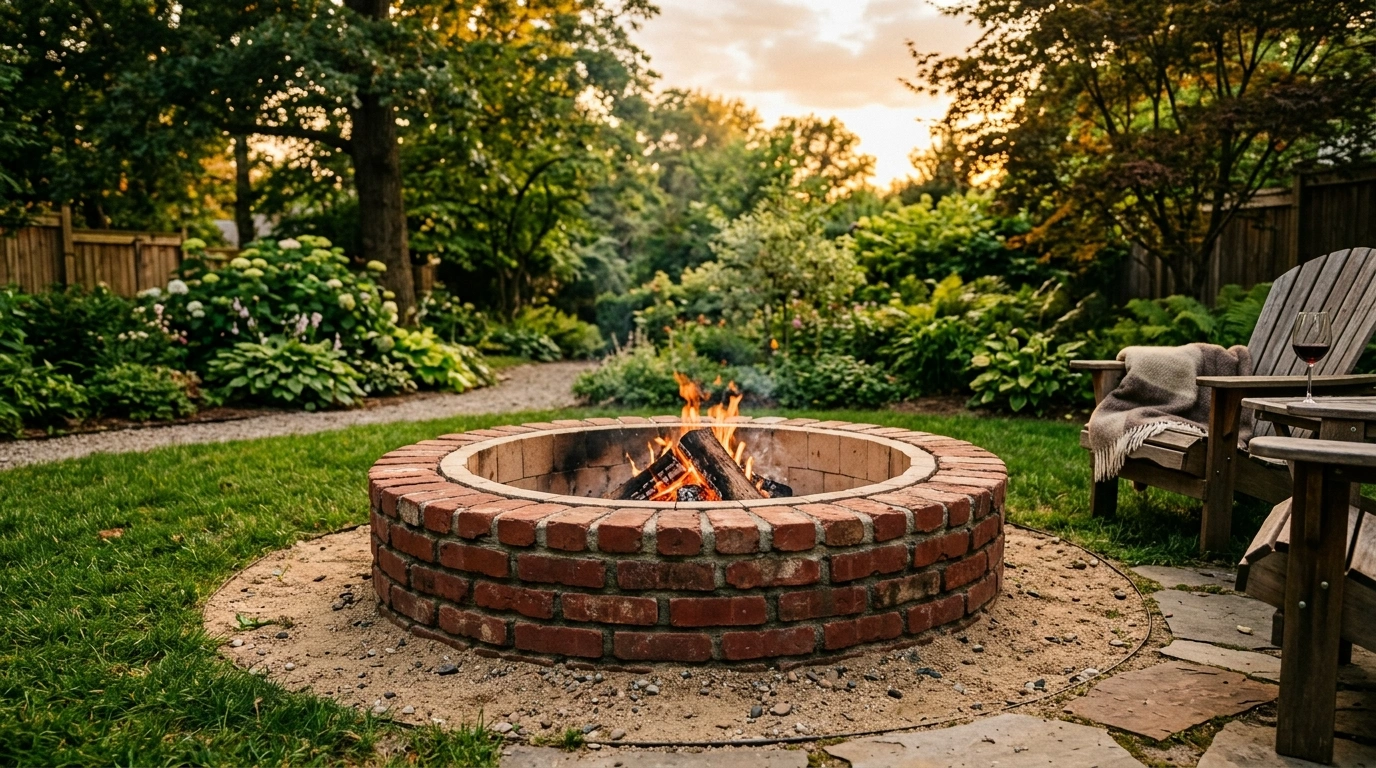
A common mistake when using brick is buying standard building bricks from the hardware store; these can trap moisture and actually burst under high heat. Instead, always make sure to line the inside of your fire pit with proper kiln-fired “firebricks,” which are designed specifically to withstand high temperatures. You can use standard red clay bricks for the outer decorative layer, stacking them in a simple circular or square pattern. Laying them in a bed of dry-pack sand and gravel makes it incredibly easy to level and adjust as you build.
Estimated Cost: $90 – $140
Time Commitment: 3 hours
The Minimalist Steel Ring on Mulch
If you want an ultra-low-maintenance option that you can finish in a single afternoon, this is the way to go. A heavy-duty, weathered steel ring placed directly onto a bed of dark, rich wood mulch or dark grey slate chips looks beautifully rustic and contemporary all at once. The contrast between the deep rust-colored patina of the steel and the dark background of the mulch creates a striking, modern look that requires almost zero upkeep.
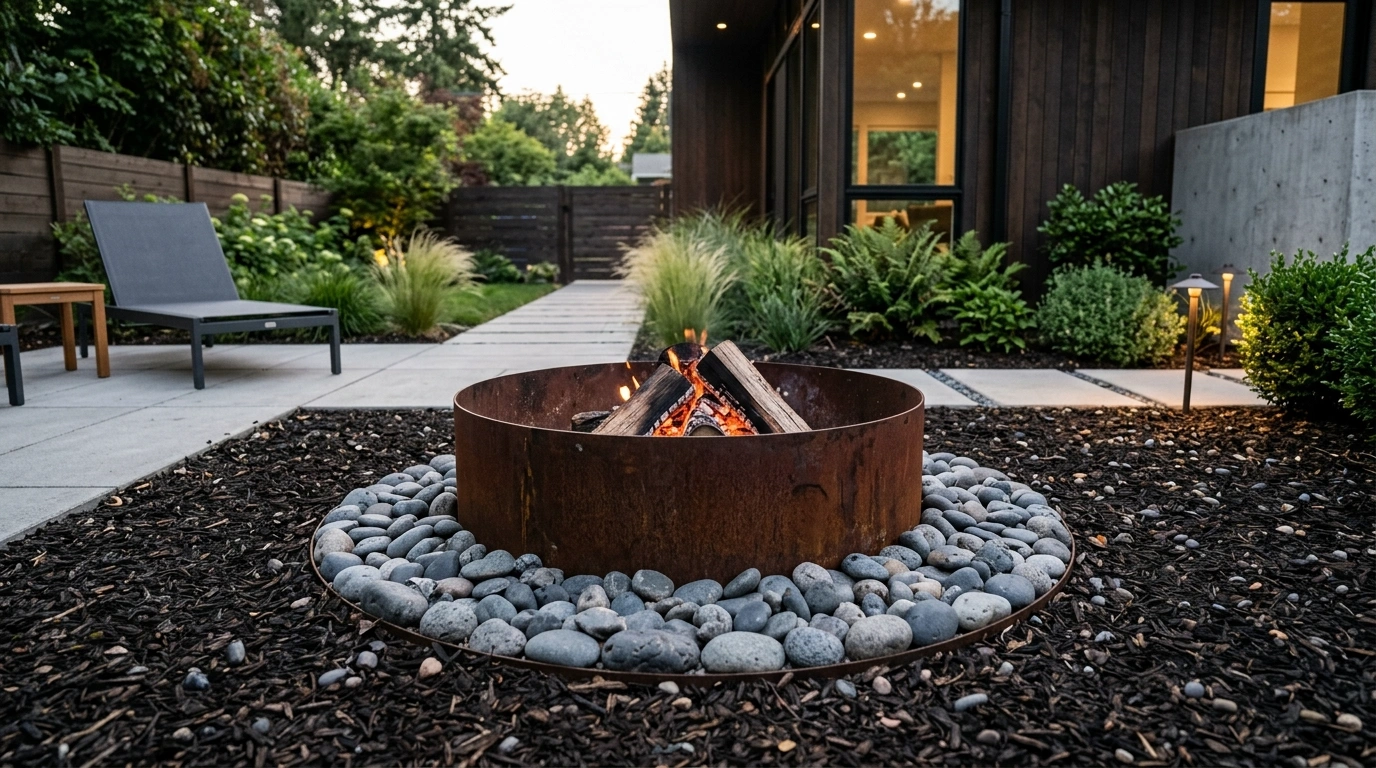
First, designate a safe zone far away from low-hanging tree branches or dry brush. Dig out a wide circle, clear the grass, and lay down a heavy layer of dark forest mulch, leaving a clear earth circle in the dead center. Place a thick, heavy-gauge steel fire pit ring directly in the middle, pushing it slightly into the soil for stability. To make this safe and prevent the mulch from catching any stray embers, fill the immediate one-foot border surrounding the outside of the steel ring with non-combustible river rocks or large gravel.
Estimated Cost: $60 – $100
Time Commitment: 1.5 hours
The Natural Boulder Fire Pit
If your backyard is bordered by woods, fields, or natural landscaping, a highly structured brick or concrete fire pit can sometimes look a bit too rigid. A boulder fire pit uses large, rough, irregular fieldstones to create an organic circle that looks like it has been there for decades. It feels incredibly cozy, down-to-earth, and perfectly suited for a rustic, cabin-style yard.
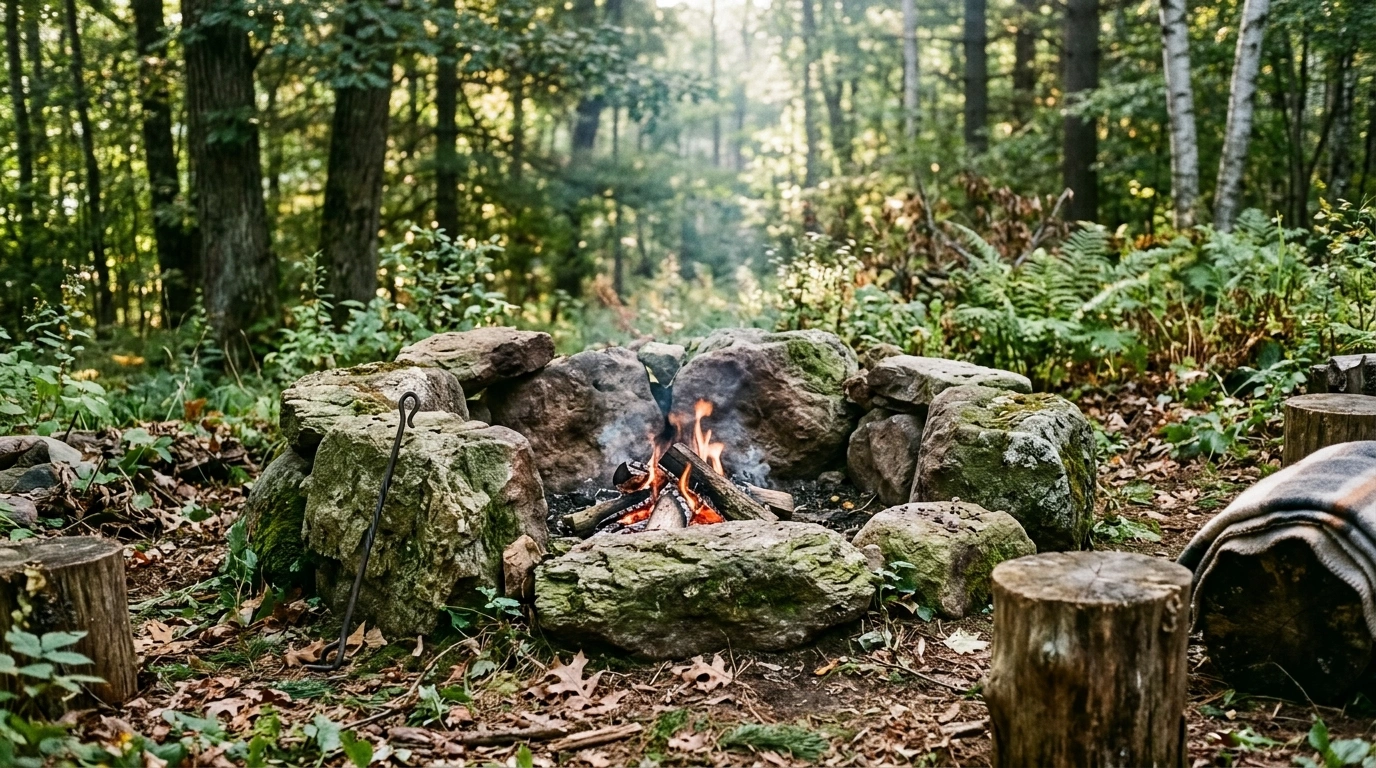
The best part about this project is that you can often source the stones for free right from your own property or a local construction site. Look for heavy, flat-bottomed stones that can sit securely on the ground without rolling or shifting. Dig a shallow circular trench to act as a stable anchor, then set your largest, heaviest boulders into the groove. Fill any large gaps between the boulders with smaller river rocks and coarse gravel to contain the coals and embers safely.
Estimated Cost: $0 – $50 (if sourcing local stone)
Time Commitment: 2–3 hours
The Gravel Circle with Adirondack Seating
This project is less about the fire pit itself and more about creating an entire outdoor room that serves as a beautiful destination in your yard. By laying down a wide, clean circle of light-colored gravel and ringing it with classic wooden Adirondack chairs, you create a beautiful, beach-house-inspired retreat. It makes your backyard feel significantly larger and more structured, providing a highly photogenic spot to relax with friends.
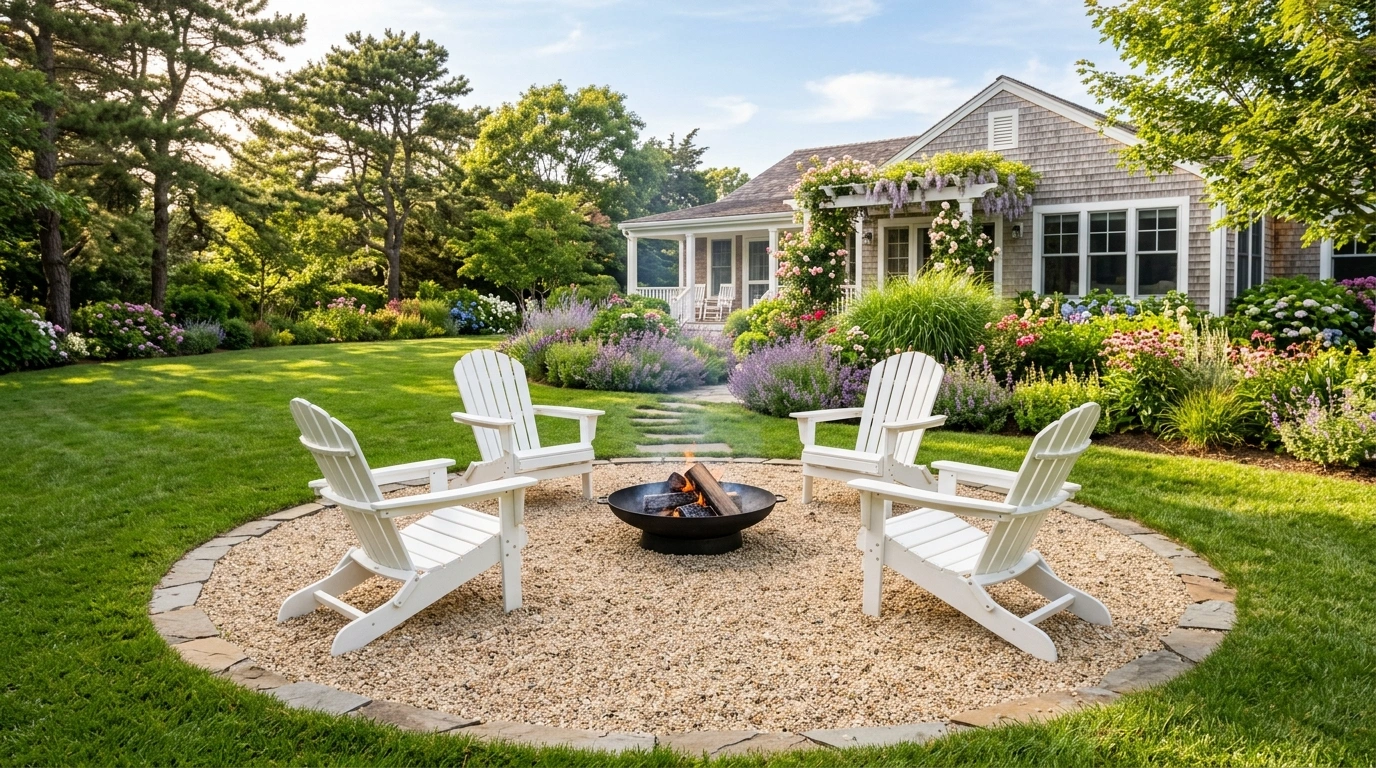
Start by mapping out a large circle (at least twelve to fourteen feet in diameter) to allow plenty of room for your chairs to sit safely back from the heat. Dig out the grass inside this circle to a depth of about three inches, level the soil, and lay down a thick layer of heavy-duty landscape fabric. Fill the circle with fine pea gravel or crushed granite, and place a simple, black metal fire bowl or a small stone pit right in the center. Add some weather-resistant outdoor cushions to your chairs to make the space feel extra warm and inviting.
Estimated Cost: $150 – $250 (excluding chairs)
Time Commitment: 4 hours
The Cinder Block Grill Station
If you love the idea of cooking over an open flame, this dual-purpose cinder block design is a brilliant addition to your yard. It functions as a cozy, warm fire pit for evening hangs, but easily transitions into a rustic charcoal grill for weekend barbecues. The simple, light grey concrete blocks give it a clean, geometric, and functional look that is incredibly sturdy.
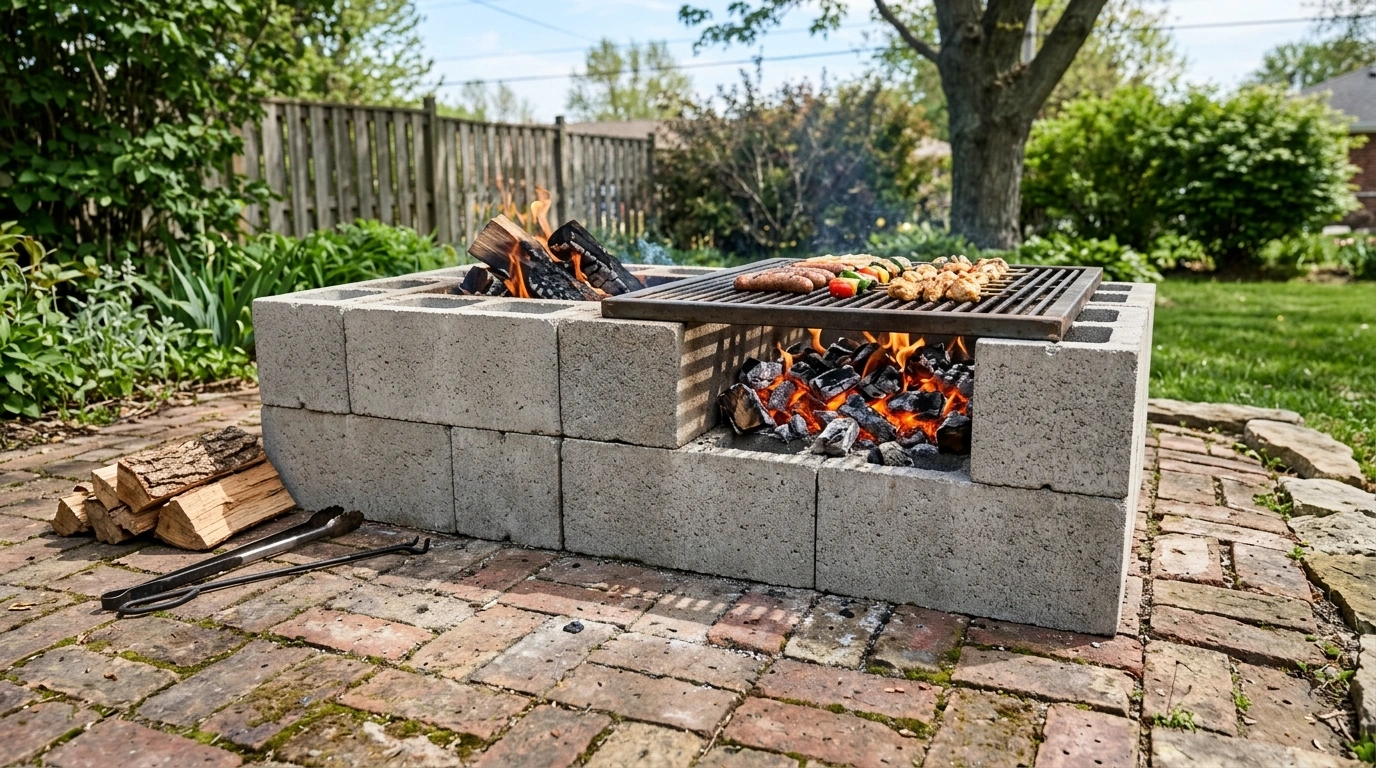
To construct this, use standard 8x8x16 concrete cinder blocks arranged in a neat rectangle. Stack them two to three layers high, keeping the hollow cores facing upward so you can fill them with sand or gravel for extra weight and stability. Leave one of the top blocks slightly loose or turned sideways to allow for adjustable airflow to your coals. You can place a heavy-duty steel grill grate across the top of the blocks, allowing you to cook burgers, steaks, or wood-fired pizzas before settling in for a cozy night by the fire.
Estimated Cost: $60 – $90
Time Commitment: 2 hours
The Stacked Flagstone Well
For a soft, romantic, and highly textured look, a stacked flagstone well is incredibly beautiful. Because flagstones are naturally flat but have irregular, wavy edges, stacking them creates a beautiful, layered look that feels organic and artisanal. It looks wonderful when surrounded by lush green plantings, delicate cottage gardens, or soft outdoor string lights.
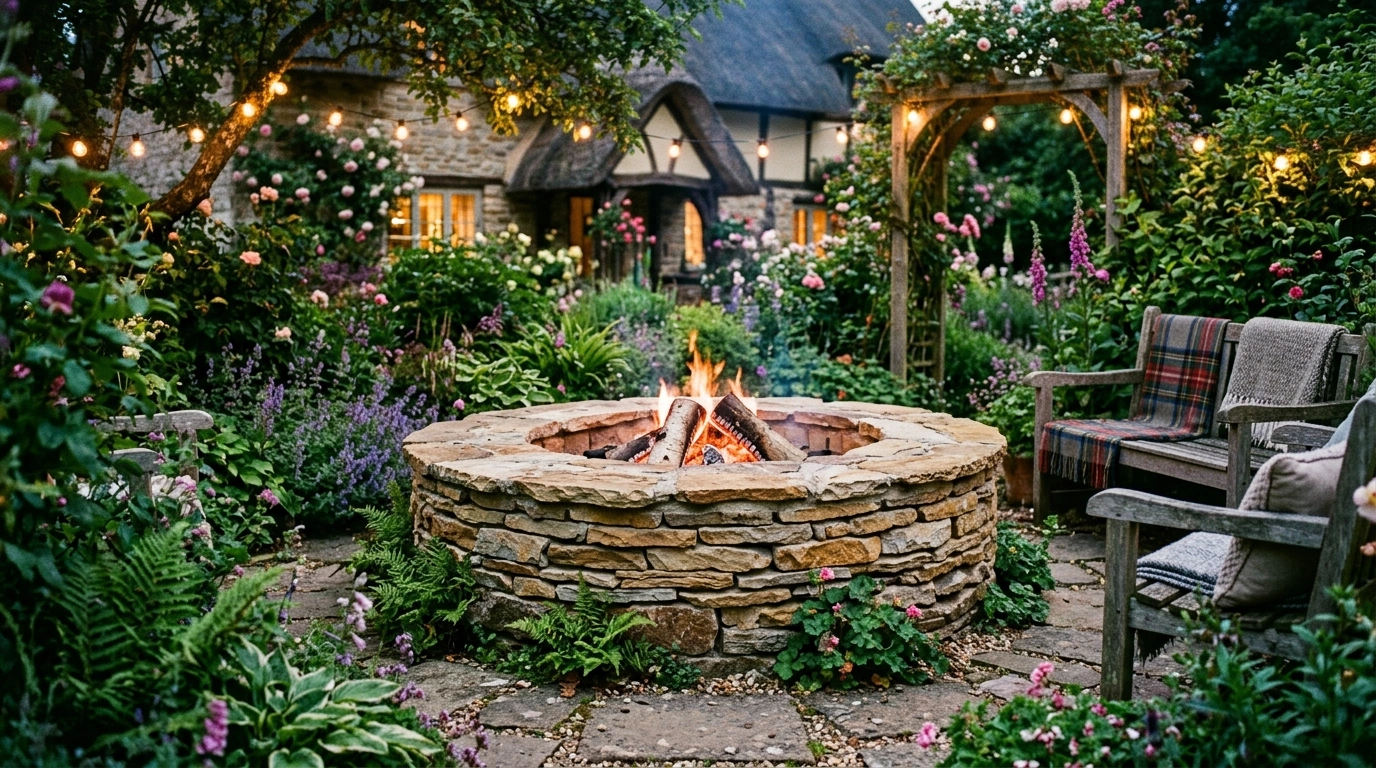
When building this, the secret is to play “stone Tetris” to find pieces that fit snugly together with minimal gaps. Lay your first ring of flagstones on a level, compacted gravel base to prevent any wobbling. As you stack the subsequent layers, use a small amount of outdoor stone adhesive on the underside of each stone to lock them securely in place. Keep the height to about three or four layers, and line the interior with a steel fire ring to protect the natural flagstone from cracking under high heat.
Estimated Cost: $130 – $200
Time Commitment: 3 hours
The Corner L-Shaped Bench Fire Zone
If you have a smaller yard or want to make the most of an awkward corner, this built-in L-shaped bench design is an incredibly smart way to maximize space. It creates a highly social, cozy, and intimate lounge area that feels like a premium resort. By building a simple wooden bench along the corner fence or garden wall, you save tons of space while keeping everyone comfortably gathered around a central fire.
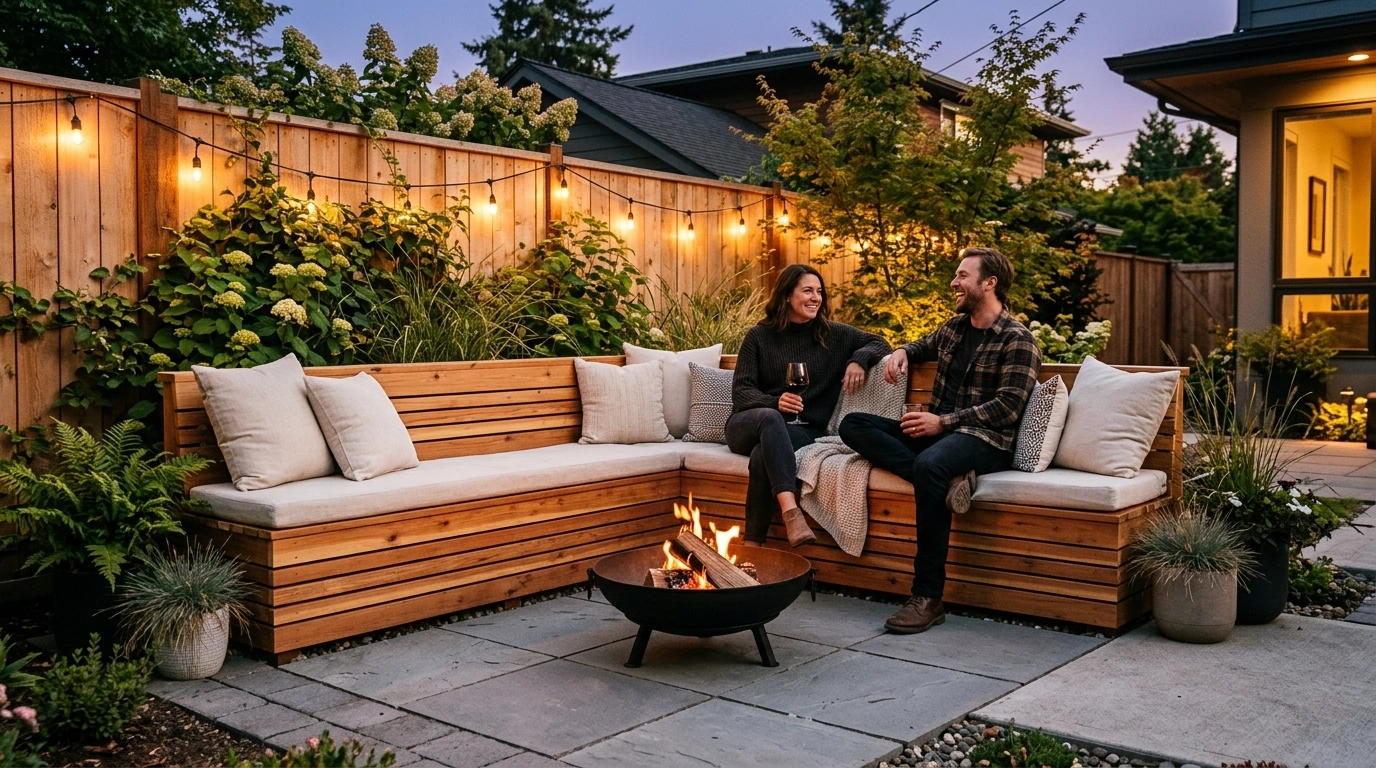
You can construct a simple bench frame using pressure-treated 2x4s and finish it with clean, horizontal cedar slats for a beautiful, modern look. In the corner created by the bench, place a simple, freestanding metal fire bowl on top of a bed of gravel or non-combustible pavers. This setup keeps the fire at a safe, comfortable distance from the seating while making the entire corner feel warm, integrated, and incredibly stylish.
Estimated Cost: $180 – $300
Time Commitment: 6–8 hours
The Half-Moon Sloped Retaining Wall
Many homeowners struggle to find a good spot for a fire pit because their yards are sloped or uneven. This half-moon design solves that problem beautifully by using a small, curved retaining wall on the downhill side to create a level, terraced flat spot for your fire pit. It looks incredibly intentional and turns a frustrating yard slope into a beautiful architectural feature.
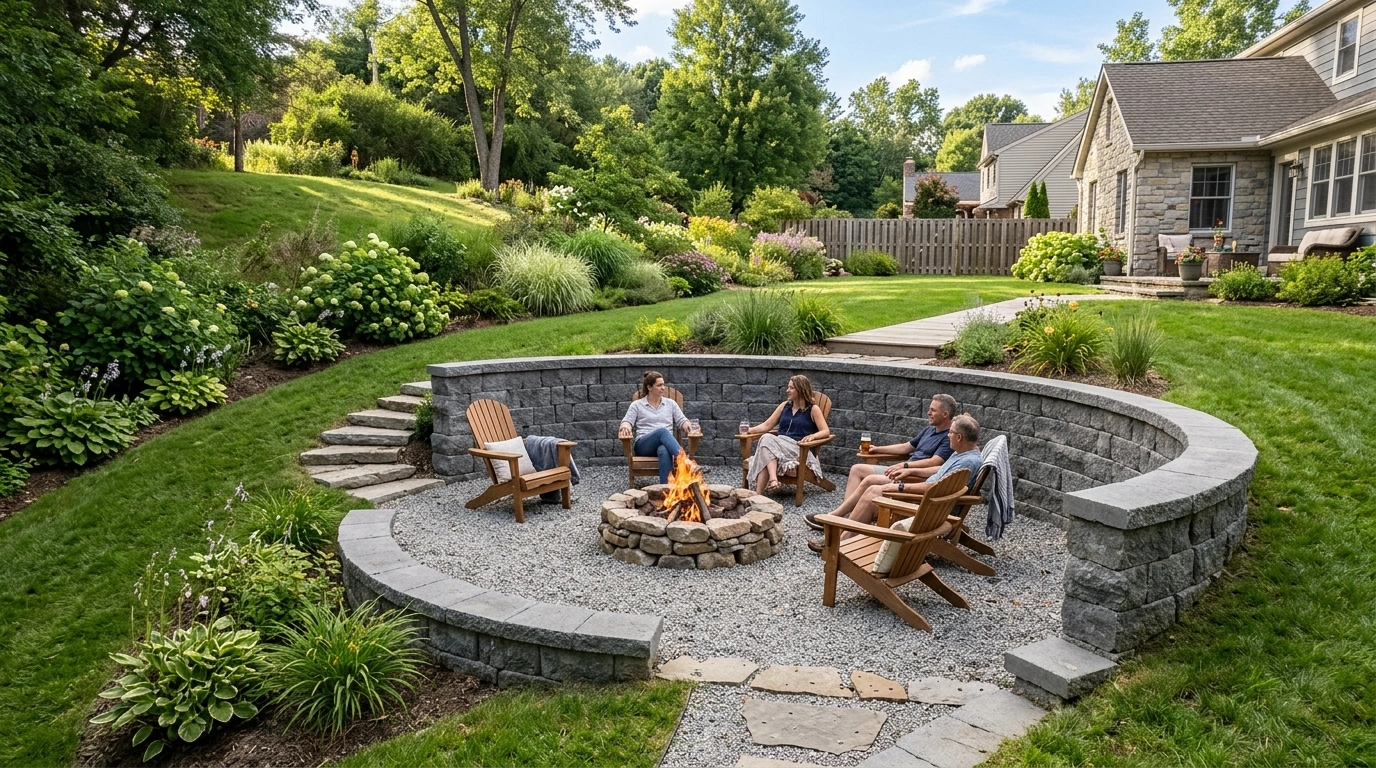
Start by digging into the slope on the uphill side to create a flat, circular shelf. Build a semi-circular wall on the downhill side using heavy, interlocking retaining wall blocks to hold back the soil and create a level border. Fill the flat circle inside the wall with crushed gravel, and place your fire pit right in the center of your newly leveled oasis. This works exceptionally well for adding a sense of structure and safety to hilly backyards.
Estimated Cost: $160 – $240
Time Commitment: 4–5 hours
The Upcycled Tire Rim Pit
If you want a fire pit that is practically indestructible, incredibly functional, and costs almost nothing, look no further than an old semi-truck or tractor tire rim. The heavy, thick steel of a large commercial rim is designed to handle immense stress and heat, making it an ideal, safe core for a long-lasting backyard fire pit. The industrial steel keeps the coals safely contained while throwing off a massive amount of radiant heat.
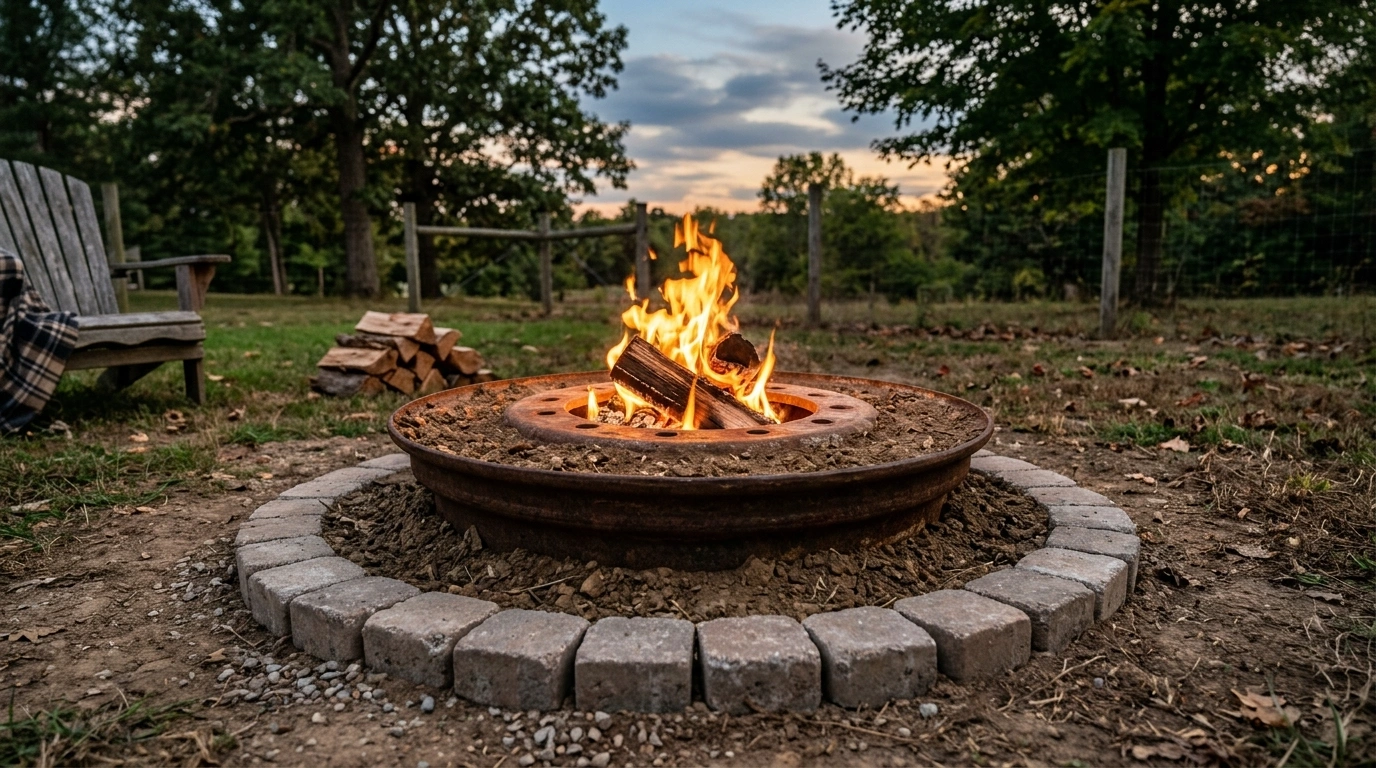
You can often pick up a used tractor or truck rim for free or very cheap from a local agricultural or tire repair shop. To give it a beautiful, finished look, you can bury the lower half of the rim into the ground, surrounding the exposed top rim with decorative river rocks or simple concrete pavers. This hides the industrial look of the rim while utilizing its incredible strength as a safe, heat-resistant barrier for your wood fires.
Estimated Cost: $15 – $40
Time Commitment: 2 hours
The Old-World Cobblestone Circle
There is a beautiful, historic charm to cobblestone paths and historic city plazas. By building a fire pit out of small, tumbled cobblestones, you can bring that same European, old-world aesthetic to your own backyard. The slightly rounded, weathered edges of the cobblestones look incredibly soft and inviting, especially when catching the warm, flickering light of a evening fire.
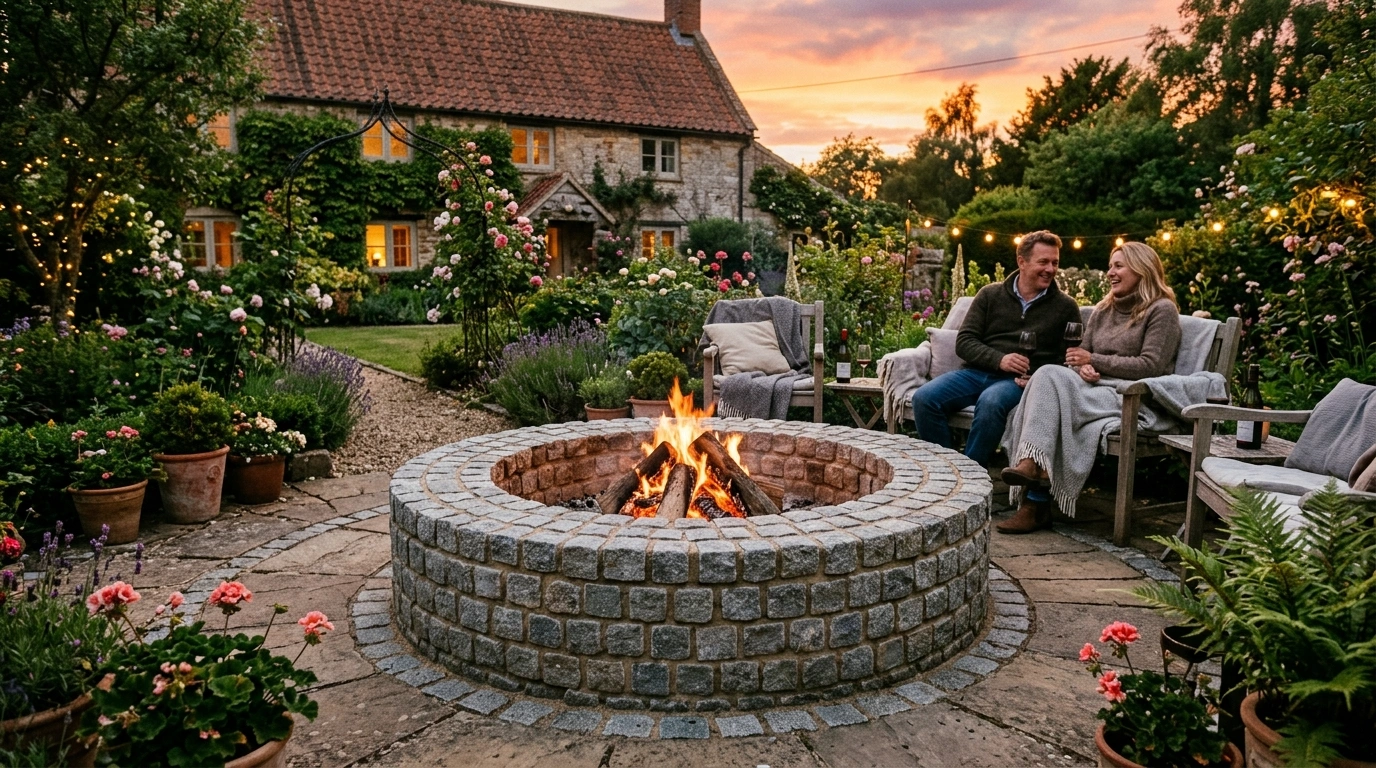
To build this, dig a shallow circular trench and fill it with leveling sand. Lay your cobblestones close together, using a rubber mallet to tap them gently into place so they are level with one another. Once your circle is complete, sweep fine polymeric sand into the cracks between the stones and mist it with water; this locks the cobblestones firmly together, preventing weeds from growing up through the joints while keeping the stones from shifting.
Estimated Cost: $110 – $170
Time Commitment: 3 hours
The Modern Concrete-Look Gas Bowl
If you love the convenience of a fire that you can turn on and off with the flick of a switch, a modern concrete-look gas bowl is an excellent choice. It gives you a clean, smoke-free flame that is perfect for quick evening hangs, without any of the lingering ash, wood prep, or smoky smell on your clothes. The minimalist, smooth grey finish looks incredibly chic, clean, and high-end.
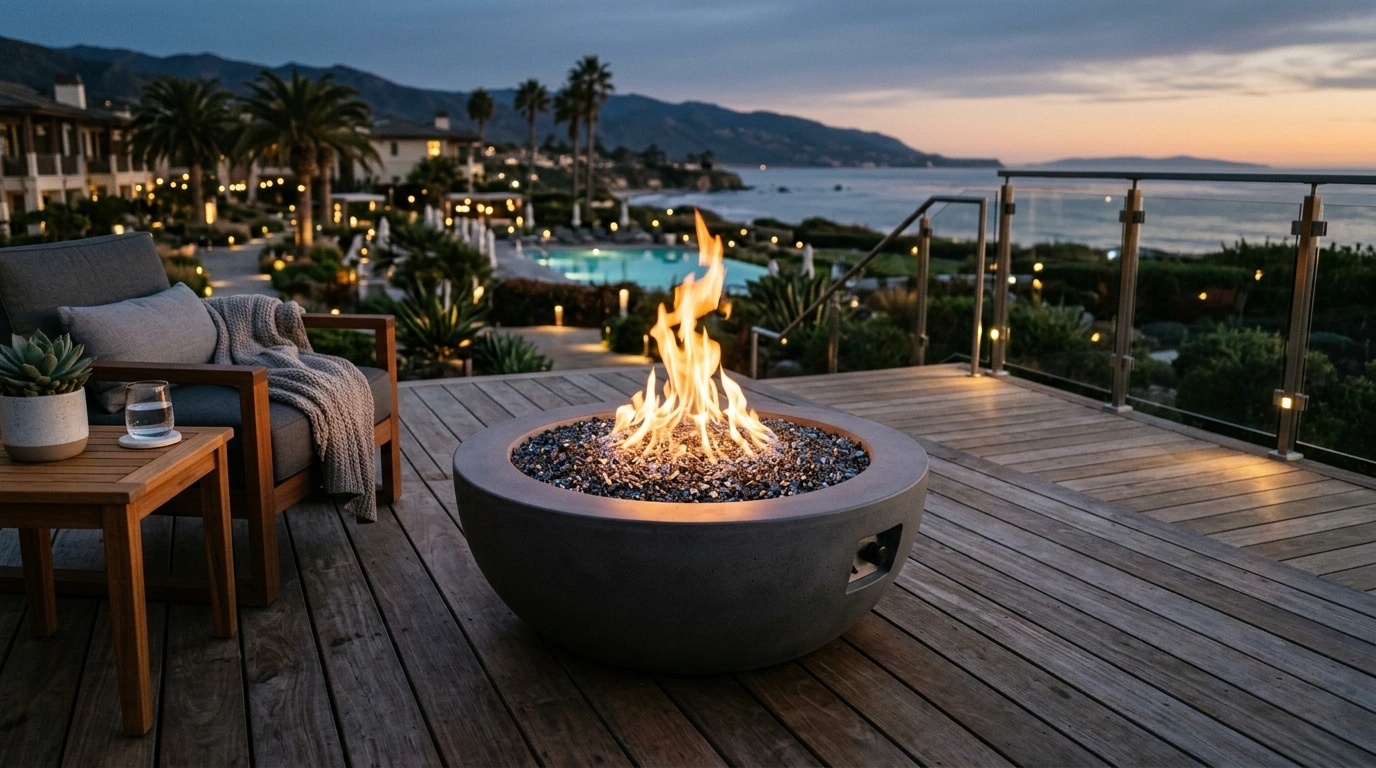
To make a budget-friendly version, you can use a large, round, lightweight concrete-composite planter. Place a small, hidden propane tank or a connection line inside, and attach a simple round burner ring. Fill the bowl with beautiful, dark grey lava rocks or reflective fire glass to hide the burner. This setup works exceptionally well on wooden decks or close to the house where traditional wood smoke might be an issue.
Estimated Cost: $140 – $220
Time Commitment: 2 hours
Conclusion
At the end of the day, creating a beautiful backyard space is about confidence over perfection. Your yard does not need a professional, multi-thousand-dollar landscaping crew to feel warm, welcoming, and incredibly stylish. A simple, well-thought-out weekend project using affordable materials can completely change the way you use your outdoor space, turning a neglected patch of grass into your absolute favorite spot to unwind.
If you are feeling overwhelmed, I always recommend starting with just one simple idea—like laying down a basic gravel circle and setting up a simple metal fire bowl. You can always build on it, add comfortable chairs, or stack stones later as you get more comfortable. The most important thing is to build a safe, cozy spot where you actually want to spend time relaxing with the people you care about.
Which of these simple backyard fire pit setups would you actually want to build first? I would genuinely love to know in the comments below!
Q: How do I make a cheap DIY fire pit look more expensive?
The easiest way to elevate a budget-friendly fire pit is by paying close attention to the ground cover and surrounding seating. Laying down a clean, well-defined circle of light grey pea gravel or dark slate chips immediately makes a simple metal fire bowl look like a high-end designer feature.
Q: What is the safest material to use for a backyard fire pit?
You should always use materials specifically rated for heat, such as kiln-fired firebricks, heavy-duty steel fire rings, or heavy natural stone. Avoid using standard concrete blocks or wet river rocks directly in the flame, as trapped moisture inside them can expand and cause them to crack or burst.
Q: Do I need a metal ring inside a stone fire pit?
Yes, I always recommend using a steel fire pit ring inside any stone or concrete paver setup. The steel ring acts as a protective heat shield, keeping the direct flame away from the stones and preventing them from crumbling, cracking, or degrading over time.
Q: How far away from the house should a fire pit be?
As a general safety rule, you should place your backyard fire pit at least ten to fifteen feet away from your house, wooden fences, low-hanging tree branches, or any other combustible structures to prevent accidental fire hazards.
Q: What can I put at the bottom of a fire pit for drainage?
A three-inch layer of coarse, crushed gravel or lava rock at the bottom of your fire pit is perfect for drainage. It allows rainwater to drain quickly into the soil below, preventing your pit from turning into a muddy pool after a storm.


